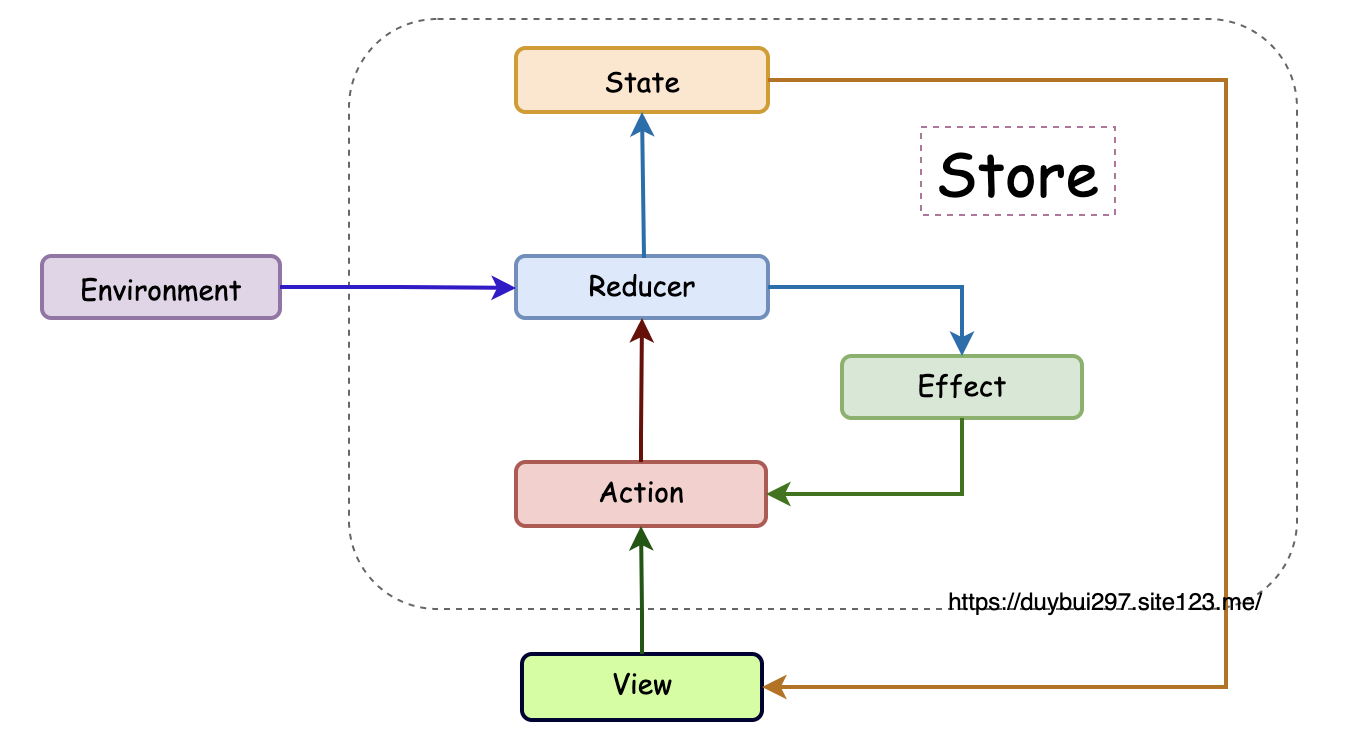
Cherry Blessing

A monad is a monoid in the category of endofunctors


  • 首页

  • 归档

  • 标签

SwiftUI + CoreData + TCA

发表于 2023-09-29 | 分类于 swiftui

Redux

Unidirectional Data Flow (UDF)

flow

CoreData

官方推荐在 SwiftUI 中使用 Core Data 的方式是通过的 FetchRequest 来进行数据查询(一个专用的 propertyWrapper,底层对 NSFetchRequest 和 NSFetchRequestController 进行了封装),可以自定义 Predicate 和 SortDescriptor。系统会触发 fetch 和监听 change 并进行 UI 的刷新。

CoreData Model

Core Data 是 Obj-C 时期的产物,同时利用了一些 Obj-C 的运行时动态的特性(KVC/KVO),所以 Model 天然不支持 Immutable 类型。

但在普通的 SwiftUI 中,@Publish 修饰的属性 property 必须是 immutable 类型,否则无法知道属性发生了改变。

在 TCA 中,Immutable 非常重要。比如能够减少 View 的刷新提升性能。

CoreData ORM

由于 Core Data 的复杂性,以及不支持 Immutable 的特性,对 SwiftUI 和 TCA 不够友好,直接将 Core Data Model 用于上层的 State 不是一个很好的选择。

一种方式是为每一个 Core Data Model 创建一个自己的 struct 类型的 Domain Model,手动的进行映射(Mapping)。但这种方式的缺点显然易见,需要写很多冗余代码,并且容易出错。

Core Data 本身就是 Obj-C 语言的 ORM,但却不是很好的 Swift ORM。Prisma 通过对 Core Data 进一步的抽象,提供一套新的 ORM 模型(主要也是利用了 Core Data 的运行时特性),Immutable, Type-safe,同时不损失大部分 Core Data 的优点。对比起手动 Mapping 也更简单。

  • Attributes: 利用 Swift KeyPath 进行映射;
  • Relationships: 对关系进行描述;
  • Query: 对 NSFetchRequest 进一步封装,利用 KeyPath 获得类型安全。

SwiftData,但依然是 class 类型,配合 Observable 使用。

TCA

Single Source of Truth

TCA (包括普通的 SwiftUI)强调的是单一可信数据源,所有的 State 统一管理起来,形成一棵(或多颗)状态数。而使用 @FetchRequest 进行访问的 Core Data 数据,没法在 TCA 中进行管理,散落在各个 View 中。

对于一个主要数据流是 CoreData 的 app 来说,使用 @FetchRequest 的话就没有什么必要再使用 TCA 了。(TCA 依然有很多好用的其他特性可以帮助我们更好的驾驭 SwiftUI,特别是一些独立成库的工具如 Dependence)

Global State / Scope State

TCA 管理的这颗状态树,如果每一个 View / Feature 都能访问和修改的话,那么管理起来就会很麻烦。而且对于模块化来说会很不友好,因为会存在双向的依赖。

同样对于性能来说,如果 State 的所有变化,所有的 View 都需要重新计算刷新的话,将会对性能造成非常大的浪费和影响。

为了解决这个问题,需要一些手段来对 State 进行拆分,把它变成单向的依赖关系。在 TCA 中 Scope 的概念,加上一些 pullback (也叫 lift)的手段。同时通过引入 ViewStore 来解决 Observe Scope 切片的问题。

Composition

TCA 中还有一个很重要的概念:Composable。

包括 State Composition 和 Reducer Composition。

State Composition 体现于 App State 这颗状态树的定义。而 App State 其实也影响着 Reducer 是怎么定义,因为 State, Action, Reducer 一般是成套配置的。

Dependency

对于 Reducer 来说,同样的输入需要得到相同的输出。所以需要把不确定的东西(包括调用环境等)作为 Dependency 来管理,也就是说通过控制 Dependency 来保证 Reducer 的纯函数的要求。

假如一个 State 的值每次初始化都不是一样的,那么这个 State 就不适合作为 State 来使用,而应该作为 Dependency 来使用。

如果一个 State 需要在不同的 View / Feature 中共享,比如:不同页面都需要显示某个 State,并且部分页面可以修改这个 State,修改后所有页面都需要进行更新。对于这类的 State,更适合把它作为 Dependency 来使用。

TCA + CoreData

TCA + Core Data 这个组合由于历史原因(所以才有了 SwiftData)没法天然的很好配合使用,比如最重要的 Data Flow 状态管理问题。还有一些问题是由于不直接使用 Core Data 而引入的新问题,有一些是 SwiftUI + Core Data 本身就有的问题或者说 Core Data 本身的问题。

新的 SwiftData 能解决很多 SwiftUI + Core Data 中的问题,但目前看到的大多数特性对于 TCA 来说并没有什么帮助,或许等 TCA 支持 Observable 后会有改变。

Data Flow

自己实现一个类似的 FetchRequest 作为 Dependency,然后在 Reducer 中进行调用。这个 FetchRequest 对 NSFetchRequestController 进行封装,然后利用 NSFetchRequestControllerDelegate 中进行数据的监听,并且在数据发生变化时把数据更新回调到 Reducer 中。

因为 Core Data 是支持 Relationship 的,所以理想的情况 Core Data 的数据结构 Entity 也是一棵树。这样是不是能通过监听树根,来知道一整颗树的所有的变化呢?然后把 Core Data 的数据结构和 TCA 的数据结构进行对应,这样就能实现 Core Data 的数据变化,直接映射到 TCA 的 State 上了。

但理想归理想,现实情况是,首先 Core Data 并不能监听到 Relationship 对象的变化,只能监听到自己的属性的变化,所以这个方案行不通[^1];其次,TCA 践行的是 Immutable 的 State,所有的 State 的变化,都应该是可以有迹可循的,不同 Reducer 之间的 State 的变化,是主动的通过 Action 来进行更新的,而不是通过监听的方式。举例来说就是 Child 页面是某一个时刻从 Parent 中通过 Scope 来拆分出来的,是一个 Immutable 的 State,所以 Parent 页面的 State 的变化,是不会影响到 Child 页面的 State 的,也就是在根 Reducer 监听 Core Data 树的变化,没有办法实时更新到所有的子节点的 State 上,也就没法实时刷新页面。

对于 Relationship 变化的监听,也可以通过监听 NSManagedObjectContext.didChangeObjectsNotification 和 NSManagedObjectContext.didSaveObjectsNotification,然后通过对比判断变化的对象是否属于当前 Fetched Object 的 Relationship 来进行判断[^1]。这一种方案的缺点在于没有强类型的支持[^2],同时现实的 Relationship 可能会比较复杂,可以是 one-to-one, one-to-many, many-to-many,还可以是多层的嵌套,这样的话,对比的逻辑就会比较复杂,怎么样的颗粒度才是合适的呢?如果所有的 Object 是一颗树状,那么是否意味着每一个 Object 的变化,会导致所有父节点的 Object 都被动变化,所谓牵一发而动全身。需要监听根节点的变化,等于所有的变化,这样的话,性能就是一个问题了。并且这种方式是不是相等于直接监听通知无脑刷新页面就好了。

KeyPath

Swift 中的 Value Type 也支持 KeyPath,但是和 Core Data 的 KeyPath 不是同一个东西,并且没有办法直接转换,因为 Swift struct 的 KeyPath 是静态的类型安全的,而 Core Data 的 KeyPath 是动态的利用了 NSObject 的运行时特性的。所以在设计接口的时候没法直接使用 KeyPath 来作为 predicate 的参数,这样会缺失很多便捷性。

Performance

Core Data 有很多的性能优化,上述的方案会导致一部分的性能优化不起作用,比如 Fault 特性。懒加载在大量数据的时候对性能的提升还是很有帮助的。除此之外,包括使用 fetchLimit 来实现分页加载;通过 predicate 来过滤非必要的数据,不要一次把所有的对象查询出来。

Alternative

在 SwiftUI 与 Core Data —— 数据定义 这篇博客中的 AnyConvertibleValueObservableObject 和 Prisma 中的 AnyConvertibleValue 类似,都是对 Core Data 的 NSManagedObject 进行了不同形式的 Mapping 抽象。相比起来 Prisma 是一套更加成熟的方案,抽象程度更高。

而 SwiftUI 与 Core Data —— 数据获取 中的 MockableFetchRequest,更像是自己实现一套 @FetchRequest propertyWrapper,同样是直接在 View 中使用,但是可以方便进行 Mock 数据。和 FetchRequestObserver[^2] 相比多了方便 Mock,但是缺少了 Observer 的功能。

Conclusion

SwiftUI + Core Data + TCA 这个组合,在目前来说还是比较不友好的,没办法既要…又要…。所以只能通过自己实现一些辅助工具来进行转换和抽象,但抽象就意味着对原有功能接口进行限制,随着功能逻辑的增加,这部分的接口就需要不断的进行扩展,这样的话,就会导致这个抽象越来越难,甚至一整套接口没法满足后来的需求而面临着重新设计重构。

同时由于没有直接使用 Core Data 的托管对象,而是转换成了一套 struct 类型的 Model,导致一些 Core Data 的性能优化没法享用。

但现在也不是没法用,可以结合实际情况来通过一些手段先解决比较重要的点。

[^1]: NSFetchedResultsController extension to observe relationship changes
[^2]FetchRequestObserver

The Composable Architecture - Best Practices
Working with a common state throughout the app
TCA - SwiftUI 的救星?(一)
聊一聊可组装框架( TCA )
SwiftUI 与 Core Data —— 数据获取

silgen name

发表于 2022-07-16 | 分类于 advanced swift

在设计 Router 组件的时候,其中必不可少的一步是路由注册,将 pattern 和 handler 函数进行绑定。

使用 @_silgen_name 来进行注册

1
2
3
4
@_silgen_name("/user")
func user(context: Context) -> Bool {
...
}

实现原理

什么是 @silgen_name

根据 Swift 的官方手册,@silgen_name 有两个作用:

  1. To specify the symbol name of a Swift function so that it can be called from Swift-aware C. Such functions have bodies.
  2. To provide a Swift declaration which really represents a C declaration. Such functions do not have bodies.
    swift/StandardLibraryProgrammersManual.md

所以可以利用第2个特性给 handler 函数指定一个导出函数符号 Exported Symbols,然后通过将 pattern 作为导出符号即可绑定对应的 handler 函数。

同时为了避免与其它导出符号冲突并且提高查找的效率,可以给导出符号加一个约定的前缀,如 ditto:。

注册

运行时利用 _dyld_register_func_for_add_image() 来监听所有的 image 加载,然后遍历带特定前缀的导出函数符号。

1
2
3
4
_dyld_register_func_for_add_image { image, slide in
let mhp = image?.withMemoryRebound(to: MachHeader.self, capacity: 1, { $0 })
let symbols = getDyldRouteSymbols(prefix: "ditto:", image: mhp!, slide: slide)
}

然后通过 unsafeBitCast(_:to:) 函数将函数符号转为 handler 函数进行注册。

1
2
3
4
let routes: [(String, Route<Coordinator>.Handler)] = symbols
.filter { $0.key.hasPrefix("ditto:") }
.map { (String($0.key.dropFirst("ditto:".count)), unsafeBitCast($0.value, to: Handler.self)) }
try? register(routes)

进阶

Ditto 在设计之初便支持范型,并且可以同时存在多个 Router(虽然没太必要)。

范型

_dyld_register_func_for_add_image() 是一个 C 函数,支持传入一个回调函数指针作为参数,定义如下:

1
void _dyld_register_func_for_add_image(void (*func)(const struct mach_header* mh, intptr_t vmaddr_slide));

回调函数并不同于一般的 closure,它不能捕获上下文信息:A C function pointer cannot be formed from a closure that captures context。所以对于支持范型的 Router 来说,就不能直接的调用这个函数。

所以我们需要用过一些其他手段先把遍历到的函数符号先存起来,再重新读取出来即可。

1
2
3
4
5
6
7
8
9
10
11
12
13
14
15
16
17
18
19
20
21
22
23
24
25
26
27
28
class SIL {
private(set) var symbols: [UnsafeMutableRawPointer?] = []
static let shared = SIL()

static func install() {
_dyld_register_func_for_add_image { image, slide in
let mhp = image?.withMemoryRebound(to: MachHeader.self, capacity: 1, { $0 })
let symbols = getDyldRouteSymbols(image: mhp!, slide: slide)
SIL.shared.symbols.append(contentsOf: symbols)
}
}
}

extension Router {
typealias Handler = @convention(thin) (Context<Coordinator>) -> Bool
public func register() {
SIL.install()
DispatchQueue.main.async {
self.register(symbols: SIL.shared.symbols)
}
}

private func register(symbols: [UnsafeMutableRawPointer?]) {
let routes: [(String, Route<Coordinator>.Handler)] = symbols
.map { (String($0.key), unsafeBitCast($0.value, to: Handler.self)) }
try? register(routes)
}
}

模块化

假如同时存在多个 Router 的话,那么只靠 pattern 无法区分要注册到哪一个。同时由于 _dyld_register_func_for_add_image() 函数无法捕获上下文,也无法传递指定的 silgen_name 前缀来进行分开遍历。

一个可行但并不优雅的方法依然是在 silgen_name 的命名中做文章,如约定特殊的前缀来进行区分。

如果不同的 Router 是在不同的模块中(module),那么可以通过遍历指定的 image (通过 _dyld_get_image_name() 方法)来注册当前模块的符号。

swift/StandardLibraryProgrammersManual.md
Should anyone be using @_silgen_name outside of the standard library developers?

some P and any P

发表于 2022-01-01 | 分类于 advanced swift

TL;DR

  • some 是另一种特殊的 generic(符合要求的未知但具体的类型)。它的目的是用来对复杂的类型进行抽象,类型的信息不会被擦除。
  • any 其实是显式的声明 existential。它的目的是用来对值进行抽象,类型信息会被 compiler 擦除。

some Protocol

写过 SwiftUI 的人对于 some 都不陌生,每一个 View 的 body 的类型都是 some View。

1
2
3
4
5
struct ContentView: View {
var body: some View {
Text("Hello World")
}
}

为什么需要引进一个新的关键词 some,不能直接写 var body: View { ... }?原因是 View 这个协议是经典的 PAT,对就是那个万恶之源 PAT 。

1
2
3
4
public protocol View {
associatedtype Body : View
var body: Self.Body { get }
}

对于 PAT 不能直接的把 View 当作一个类型来使用,Protocol ‘View’ can only be used as generic constraint because it has Self or associated type requirements。View 这个 PAT 没法自动生成一个 Existential,所以不能直接写 var body: View { ... },必须明确指定 View 的具体类型。

1
2
3
4
5
6
struct ContentView: View {
// typealias Body = Text
var body: Text {
Text("Hello World")
}
}

明确 Body 的具体类型,有助于揭示 ContentView 的部分实现,同时也使得声明变得脆弱。如果想改变 body 的返回类型,必须同时修改对应的类型。在这个场景中,具体的 body 返回类型其实并不重要,重要的是它符合 View 协议,它是一个 View。这时候如果想要抽象出声明的返回值类型,就必须要考虑 existential 或者 type erasure。

基于这一点,Swift 5.1 中引入了 SE-0244 opaque result types 这一特性。some Protocol 表示一个确定的实现了 Protocol 协议的类型。同时它还有一个要求,就是 some 修饰 return type 的时候,要求所有的 return 语句返回相同的具体类型。

1
2
3
4
5
6
7
8
protocol P { }
extension Int : P { }
extension String : P { }

func foo(flip: Bool) -> some P {
if flip { return 17 }
return "a string" // error: different return types Int and String
}

在一个支持范型的语言中,想使用 PAT 又不需要指定具体的类型对于编写简洁代码非常重要。考虑一下嵌套的范型,如 SwiftUI 中那些 View 的 body 的真实类型。

当然,some 只是在编写代码的时候帮助我们进行了简化,类型信息依然存在,SwiftUI 非常依赖这些信息进行 View 的更新。

any Protocol

Swift 中想要把一个 Protocol 作为一个类型来用,要求这个 Protocol 必须不能是 PAT,否则的话就会报错 Protocol can only be used as generic constraint because it has Self or associated type requirements。为了缓解这个问题,Swift 引入了 SE-0309 unlock existential types for all protocols,compiler 帮忙自动的进行 type erasure。

1
2
3
4
5
6
7
protocol Logging: Hashtable { }

// before
// -func add(_ logger: AnyLogger) {
// after, 🙂️ OK
func add(_ logger: Logging) {
}

到这里,PAT 的使用成本大大的降低,实用性大大提升。终于可以像使用范型那样的使用 PAT 了。

1
2
3
4
5
func add(_ logger: Logging) { ... } // existential type
func add<T: Logging>(_ logger: T) { ... } // generic type

let logger: MemoryLogger
add(logger)

但是 generic type 和 existential type 始终是不同的东西,前者是 type-level abstraction 而后者是 value-level abstraction,前者强调的是类型以及类型之间的关系,后者关心的是值,类型信息被 compiler 帮忙抹除掉。

为了从语法上区分开两者,Swift 又引入了 SE-0335 existential any,existential type 必须通过 any 关键词进行显式声明 。

1
2
let logger: Logging = MemoryLogger() // before
let logger: any Logging = MemoryLogger() // after

至此,终于可以一致的对待 Swift 中的所有 protocol 了,而不需要区别它是不是 PAT。

Type-level and value-level abstraction

要深入了解 some 和 any,还是要先了解什么是 type-level abstraction 和 value-level abstraction 。

Type-level abstraction

Generics(范型)提供了类型层面上的抽象,范型允许函数或者类型与符合给定约束集的任何类型统一使用,同时保留了在任何特定实例中使用的特定类型的标识。泛型函数引入了代表特定类型的类型变量(type variables,感觉更多时候被叫做类型参数?)。 这允许函数声明它接受任何符合协议的值。

1
func foo<T: Collection>(x: T) { ... }

类型变量 T 在类型层面上抽象出特定的 Collection 类型。具体的类型标识仍然保留着,因此类型系统可以保留不同值之间的类型关系。

1
func bar<T: Collection>(x: T, y: T) -> [T] { ... }

Value-level abstraction

Existential 类型提供了值层面上的抽象。与绑定一些符合约束的现有类型的泛型类型参数相比,existential 类型是一种不同的类型,它可以保存符合一组约束的任何类型的任何值,在值层面上抽象底层的具体类型。Existentials 允许不同的具体类型的值作为相同的存在类型的值互换使用,在值层面上抽象了底层符合类型之间的差异。同一个 existential 类型的不同实例可以持有完全不同的底层类型的值,并且改变一个 existential 类型可以改变该值所持有的底层类型。

Type-level abstraction is missing for function returns

泛型是 Swift 在函数接口中进行类型层面的抽象的工具,但它们的工作方式基本上在调用者的控制之下,也就是说具体类型由调用方来决定。

1
func zim<T: P>() -> T { ... }

对于 zim 这个范型函数,具体返回的类型 T,是由调用方来决定,实现方(callee)只声明了它必须要满足 P 约束。

1
2
let x: Int = zim() // T == Int chosen by caller
let y: String = zim() // T == String chosen by caller

“Reverse generics” for return type abstraction

但有时候,实现方真正希望的 zim 函数是它返回一个 P 类型,但具体是 Int 还是 String 由实现方来决定。这点与普通的范型刚刚相反,可以认为是反向的范型(reverse generics)。

1
func zim() -> P { ... }

此时的 P 不再是用来作为范型约束,zim 函数返回的值是一个 existential。

Expressing constraints directly on arguments and returns

为了完善 Swift 的类型抽象系统,提出了使用 some 这个修饰符来对参数和返回值表达约束,而不需要使用 existential 类型。

1
func concatenate(a: some Collection, b: some Collection) -> some Collection { ... }

甚至可以使用 where 来表达它们直接的类型关系。

1
2
3
func concatenate(a: some Collection, b: some Collection) -> some Collection
where type(of: a).Element == type(of: b).Element,
type(of: return).Element == type(of: b).Element

Conclusion

  • some 是另一种特殊的 generic(符合要求的未知但具体的类型)。它的目的是用来对复杂的类型进行抽象,类型的信息不会被擦除。
  • any 其实是显式的声明 existential。它的目的是用来对值进行抽象,类型信息会被 compiler 擦除。

some 和 any 是对偶的(duals)两个修饰词,它们都解决了 PAT 所带来的一些不方便的问题。目前 Swift 只支持使用 some 来修饰返回值,而 any 的使用场景则比较多。

Ref

swift-evolution/0244-opaque-result-types.md at master · apple/swift-evolution · GitHub
swift-evolution/0309-unlock-existential-types-for-all-protocols.md at main · apple/swift-evolution · GitHub
swift-evolution/0335-existential-any.md at main · apple/swift-evolution · GitHub
Improving the UI of generics - Discussion - Swift Forums

∃ Existential

发表于 2019-06-05 | 分类于 advanced swift

最初看到 existential 这个词,是在 Swift Associated Types, cont. 这篇文章中(第一次知道 typealias Any = protocol<> 也是在这篇文章),但当时并没有对这个陌生名称留下什么深刻印象。

后来陆陆续续应该也看到过一些,比如 Understanding Swift Performance - WWDC 2016。

真正的想要去了解它,是之前写 PATs 的时候,那时候 existential 这个词很高频的出现,甚至是和 PATs 息息相关,所以进行了一个初步的了解。

但是呢,只是片面的了解,而没有建立起立体的认识,记忆很快就会开始模糊,直到最后忘记掉。所以才有了这次的 existential 认知之旅。

注:这篇大多数概念、观点、片段都来自于官方文档或者参考文章,小部分自己的认知理解,并且不保证理解的正确。

Existential Type

想理解 existential,必须要先了解 existential values, existential containers 和 witness tables 的概念。

在类型论中, existential type 描述了抽象类型的接口。当对象的类型是 protocol 时,就会用到 existential type,因为存储或传递一个 protocol 类型的对象意味着对象在运行时的真实类型是不透明的(也就是编译期不可知的,因此我们也无法确定这类对象的布局)。

一个遵从了特定 protocol 的类型一定包含其约定的所有方法,但是这些方法的地址是无法在编译期确定的,因为我们只有在运行时,才能确定这个 protocol 对应的真实类型。这和 non-final class 引用是类似的(因为可能被 override),因此也使用了 类似的技术手段 来解决。Protocol 中约定的每一个被实现的方法的地址,都被保存在 witness table 中。

Existential Value

显然的,existential type 的值,就是 existential value。:P

Existential Container

1
2
protocol Foo {}
let foos: [Foo] = ... // What's the memory storage looks like?

简单来说 existential of a protocol 就是一个编译器生成的盒子 box,用来存放遵从这个 protocol 的值,这个盒子,也叫做 Existential Container,盒子里面的东西,就叫做 witness。

关于 existential container 的内存布局,这些值怎么存储,要分几种情况来说。因为值类型和引用类型的处理方式不一样,值比较小和比较大也可以为了性能用不同的策略。Understanding Swift Performance - WWDC 2016 和 ABIStabilityManifesto · GitHub 中都有详细的描述。

简单来说就是 5 个字节的大小,前三个连续的字节叫做 value buffer,用来存放对象的值或者指针。值类型如果放得下,就直接内联放在 value buffer 里面,如果放不下,就在存放在堆上,把指针地址存放在 value buffer 里;引用类型直接放指针。
第四个字节存放 vwt (value witness table) 指针。
第五个字节存放 pwt (protocol witness table) 指针。

对于那些限定了只能是 class 实现的 protocol,containers 中则会忽略 vwt 指针(因为对象自身包含指向自己类型信息的指针)以及多余的内连 buffer。并且,这里还有一个特例 Any,由于它没有遵从任何 protocol,因此 Any 对象的 containers 中没有 witness table 指针。(没错,Any 也是一个 existential !即使 Swift 3 之后把 Any 当作了 keyword,但估计和之前的 protocol <> 差不多的实现,所以依然是 existential 。)

VWT

每一个具体类型(concrete type)都有一张 value witness table,用来存放这个类型的有关内存布局和操作它的值的信息。当一个值类型具有不透明布局的时候,因为值编译的时候没办法知道实际类型,所以只能通过查询这个表来知道这些有关信息(metadata)。

PWT

Protocol witness table 是 protocol 接口的一张函数表。如果有 associated type,它还会存储 associated type 的 metadata。

所以什么是 existential 是什么?就是一个 protocol 类型的值。

Protocol

当一个 protocol 作为类型而不是具体的类型约束的时候,它就是一个 existential。

1
2
3
4
5
6
7
8
protocol Foo {}

func bar<T: Foo>(_ foo: T) {} // This requires a concrete T that conforms to Foo
func baz(_ foo: Foo) {} // This requires a variable of type Foo (pedantically: "a Foo existential")

let foo: Foo = ... // existential of protocol `Foo`
bar(foo) // 😢 Protocol type 'Foo' cannot conform to 'Foo' because only concrete types can conform to protocols
baz(foo) // 😊

所以当看到 “a protocol doesn’t conform to itself” 的时候,它实际上是指 “the existential of a protocol doesn’t conform to that protocol”。

Generic

Existentials 不是真正的泛型(generic),但由于它们相互依赖于 protocol,这两个系统紧密地交织在一起。

While protocols create existential (“there exists”) types, generics create universal (“for all”) types.

先回顾一下泛型的一些常见概念:

  • 泛型函数 func swap<T>(_ a: inout T, _ b: inout T)
  • 类型参数 <T>
  • 泛型类型 Queue<T>
  • 类型约束 <T: Protocol, U: Class>
  • 关联类型 associatedtype T
  • 泛型从句 func foo<T: P, U: P>(_ a: T, _ b: T) where T: Equatable, T.Item == U.Item

当使用泛型作为类型约束的时候,会涉及到 existentials。

1
2
3
func bar<T: Foo>(_ foo: T) {}
let foo: Foo = ...
bar(foo) // Protocol type 'Foo' cannot conform to 'Foo' because only concrete types can conform to protocols

PATs

既然有 existentials 了,那为什么还需要 type eraser 呢?

先回过头来看看之前在 PATs 中遇到的几个问题。

Protocol ‘Caching’ can only be used as generic constraint because it has Self or associated type requirements

它的意思是,Caching 这个 PATs 没有(无法自动生成)一个 existential.

Using ‘Logging’ as a concrete type conforming to protocol ‘Hashable’ is no supported

它的意思是,这个 Logging 的 existential 没有实现 Hashable 这个协议。

为什么无法为 PATs 生成一个 existential 呢?实际上是可以的,但它很复杂。它可以通过一种叫做 generalized existentials 的技术,生成一个 implicit existential。即使这样,它还有很多问题需要解决。

对于 existential 的自动生成,首先 existential 是运行时的(泛型 generic 是编译时的),它是通过在运行时,把 protocol 的一些信息存放在 existential container 里面。当 protocol 里面存在有 associated types 或者有 Self 约束的时候,它没办法针对任意类型(Any)自动生成填充这个 existential container。(Swift 是静态语言,对于泛型需要在编译时就进行泛型特化,generic specialization,除非把泛型当作是 Any 来处理。还有一种方式就是对 PATs 进行约束,let strings: Any<Sequence where .Iterator.Element == String> = ["a", "b", "c"],也就是 AnySequence<String> )

理解这一点非常重要,可能会有点晕,再来捋一下。首先编译器把存储或者传递的 protocol 类型,先替换成 existential container(生成代码),然后再编译成目标代码。当编译器发现这个 protocol 是 PATs 时,它如果不通过 generic specialization 的话,无法生成不带泛型的代码。那为什么说 existential 是运行时的呢?因为存储或传递一个 protocol 类型的对象意味着对象在运行时的真实类型是不透明的(也就是编译期不可知的,因此我们也无法确定这类对象的布局)。

还有一些类型是不适合自动生成 existential 的,编译器没法满足有 init 和 static 的要求。比如 Decodable 这样的没有实例方法的协议,existential 没有任何意义。

1
2
3
4
5
6
7
8
9
10
11
12
13
14
15
16
17
18
19
20
21
public protocol Decodable {
init(from decoder: Decoder) throws
}

struct Model: Decodable {
let x: String
}

func decode(_ decodable: Decodable) {
}
let decodable: Decodable = Model(x: "x")
decode(decodable)
// 上面对代码编译起来没有任何问题,也就是能自动生成 *existential*
// 但对于 decode(_:) 函数,根本无从下手,因为 Decoder 需要的是一个遵守 Decodable 协议的类型,而不是值。

func decode(_ type: Decodable.Type) {
let decodable = JSONDecoder().decode(type, from: data)
// let decodable = JSONDecoder().decode(Decodable.self, from: data)
// Protocol type 'Decodable' cannot conform to 'Decodable' because only concrete types can conform to protocols
}
// 最终还是那个 `Protocol type 'Decodable' cannot conform to 'Decodable' because only concrete types can conform to protocols`

其实 type eraser 和 existentials 这两种是对偶的( duals ),泛型( generic )的 Any<T> 等同于 协议( protocol )的一种 explicit existential。

Existential in Other Language

Existential type in Java

Java 泛型中的 Wildcards 其实就是一种 existential type,比如 java.util.List<?>。

在 Java 中由于有类型擦除 的存在,泛型的参数类型信息在运行时会丢失,在运行时无法根据已知的类型信息区分 List[Int] 和 List[String]。

1
2
3
List foo = new ArrayList();
foo.add("foo");
foo.get(0); // "foo"

当没有给出类型参数的时候,通过使用 existential 来解决。

1
2
3
List<?>
List<? extends Number>
List<? super Integer>

Existential type in Kotlin

Kotlin 中没有 existential type。它有一个概念叫着 The Existential 的概念。

1
2
3
4
5
6
abstract class Animal()
class Dog()
class Bar<T> {
}
var dogBar: Bar<Dog> = Bar()
var animalBar: Bar<Animal> = dogBar // 😢
1
2
3
4
class Bar<out T> {
}
var dogBar: Bar<Dog> = Bar()
var animalBar: Bar<Animal> = dogBar // 😊

Existential type in Scala

ArrayList() == List[]

1
2
3
4
5
6
7
8
object Trait {
def foo(seq: Seq[String]): Seq[String]
def foo(seq: Seq[Int]): Seq[Int]
}
// Error, have the same type after erasure

List[_] // List[T] forSome { type T }
trait List[+T]

Existential type in Rust

fn foo() -> impl Trait

核心在于 impl Trait,和 Swift 5.1 Opaque Result Types 中的 func foo() -> some P 一样。

Conclusion

Existential 是什么?Existential 就是 protocol 类型的值。这是编译层面相关的概念,平时写代码不需要知道它意味着什么或者是什么,只需要知道它会跟你想象中一样 work 就行了。

Ref

Swift Associated Types, cont. - Russ Bishop
ABIStabilityManifesto · GitHub
GenericsManifesto · GitHub
Improving the UI of generics - Swift Forums
Protocols III: Existential Spelling - Cocoaphony
Existential types - Wikipedia
Understanding Swift Performance - WWDC 2016
0244-opaque-result-types - GitHub

From Result to Error Handling

发表于 2018-11-19 | 分类于 advanced swift

最近关于 Add Result to the Standard Library 的提案正在激烈的讨论中,讨论的内容从命名到异步错误处理,再到是否应该有一个 Either 类型等等。

Result

对于在项目中使用过 Swift 的人来说,Result 类型应该再熟悉不过了,在 community 中有着非常广泛的应用。最早看到对于 Result 的应用是在Alamofire 中,然后是有订阅的博客开始介绍 Result 是如何帮忙解决非必要的错误值/可选值检查,明确的区分成功和失败。再后来就是大家都开始在项目中使用 Result 类型来进行 异步错误处理。

为什么说 异步错误处理 呢,因为最早接触到 Result 这个类型的使用案例,就是用来处理异步错误的,并且它非常的适合,如果不从语言设计上考虑的话,它可以说是非常完美,因为它和 Optional 一样是个 Monad。虽然 Result 只是一个非常简单的数据结构,它和同步异步一点关系都没有,它只跟错误处理有关。

Error Handling

错误处理按执行顺序上可以分为同步(synchronization)和异步(concurrency)两种。

同步错误处理在 Cocoa 中有两种,一种是 throw + try catch,遇到异常的时候函数内部通过 throw/raise等关键词把异常信息抛出,调用方通过 try catch 进行捕获。另一种是古老的 C 中的 Error 指针,调用方通过把 Error 指针作为参数传到函数内部,当遇到错误时,给 Error 指针赋值,以达到把错误信息往外传递的目的。

异步错误处理在 Cocoa 中一般是通过 block, delegate 或者 notification 等方式进行传递,但大多数接口通常会把正常结果回调和异常结果回调合并一起进行回调,好处在于不需要两个 block 或者两个 delegate 函数或者 notification,缺点也就是上面的 Result 解决的问题。除此之外也有一些比较少见的方式,比如 AVAssetExportSession,它的 completionHandler 是 @escaping () -> Void,并不携带任何正常和错误的信息,而是通过 var status: AVAssetExportSession.Status 和 var error: Error? 等属性来提供。

抛开遥遥无期的 async/await 不谈,对于异步错误处理来说,可能由于网络库之类的接触的太多,所以平时去设计 API 的时候都非常的顺手的就写出来了,要么 completionHandler: (Value?, Error?) -> Void,要么 completionHandler: (Result<Value>) -> Void。但是对于同步错误处理却不是这样。

首先在 Swift 中推荐的错误处理是 throw + try catch,所以 Error 指针是不需要再讨论的。但不知道是因为 throw + try catch 难用,还是因为懒,一般的项目中其实很少见到 throw/throws/rethrows 这样的关键词(ObjC 中很少见到 throw/raise 同理)。

注:异步中是无法直接使用 throw + try catch,下面的两种写法都是不合法的:

1
2
3
4
5
6
7
8
9
10
11
12
13
func remove(forKey key: StoreKey) throws {
queue.async {
let url = try disk.url(atPath: path(forKey: key), in: directory)
try disk.remove(at: url)
}
}

func remove(forKey key: StoreKey) throws {
try queue.async {
let url = try disk.url(atPath: path(forKey: key), in: directory)
try disk.remove(at: url)
}
}

万恶的 return

一个当前在做的 Alligator 项目中的代码片段:

1
2
3
4
5
6
7
8
9
10
11
12
13
14
15
16
17
18
/// 视频导出
///
/// - Parameter asset: 要导出的视频资源
/// - Parameter outputURL: 指定的导出地址
func export(asset: AVAsset, to outputURL: URL) {
guard outputURL.isFileURL else {
assertionFailure("output url must be file url.")
return
}
...
guard let exportSession = AVAssetExportSession(asset: asset, presetName: AVAssetExportPresetHighestQuality) else {
return
}

exportSession.outputURL = outputURL
exportSession.outputFileType = .mp4
...
}

这个函数的大概功能是进行配置和导出视频到文件,看起来是不是很熟悉?有参赛合法性的判断,提供开发调试帮助的 assertion,guard 的使用也很合理。

再看一段:

1
2
3
4
5
6
7
8
9
10
11
12
13
14
15
16
17
18
19
20
21
// VideoProcessor.swift
func prepare() {
let videoWriterInput =
let audioWriterInput =
guard let videoWriter = try? AVAssetWriter(outputURL: outputURL, fileType: .mp4) else {
return
}

if videoWriter.canAdd(videoWriterInput) {
videoWriter.add(videoWriterInput)
} else {
assertionFailure("can't add video writer input")
}

if videoWriter.canAdd(audioWriterInput) {
videoWriter.add(audioWriterInput)
} else {
assertionFailure("can't add audio writer input")
}
...
}

类似这样的代码在 project 中应该非常常见,但是却有着非常大的问题,那就是 故意的忽略异常。只处理了一切正常执行的分支,当遇到异常的时候,直接 return 或是加上 assertion 信息。这样写大多数情况下都没有什么问题,功能也正常,即使是遇到了异常情况,也不会引起 crash,但却有着很大的缺陷。(甚至有很多人连 assertion 都不用,替而代之的是 print :P

在这个例子中这些视频处理的逻辑实际上是相对比较独立的,功能也比较”单一”,这些异常一旦出现,后续的逻辑基本都是不可用,并且大多数的异常在实际应用中是需要被调用方知道并处理的,比如体现在 UI 上。

一个带异常处理(滑稽)的视频处理的示例代码片段:

1
2
3
4
5
6
7
8
9
10
11
12
13
14
15
16
17
18
19
20
21
22
23
24
25
26
27
28
29
30
31
32
33
34
35
36
37
38
39
40
41
42
// AVAsset+Processor.swift

extension Alligator where Base: AVAsset {
/// Merge the given video asset and audio asset
///
/// - Parameters:
/// - videoAsset: the given video asset
/// - audioAsset: the given audio asset
/// - Returns: the merged asset
/// - Throws: throws error when the given asset is invalid. e.g. video asset without video tracks.
public static func merge(videoAsset: AVAsset, audioAsset: AVAsset) throws -> AVAsset {
let mixComposition = AVMutableComposition()

try mixComposition.agt.add(.video, from: videoAsset)

let videoDuration = mixComposition.duration
try mixComposition.agt.add(.audio, from: audioAsset, maxBounds: videoDuration)

return mixComposition
}

/// Merge the given assets one by one
///
/// - Parameters:
/// - segments: given assets, it can't be empty
/// - isMuted: if true, it will passthrough audio tracks
/// - Returns: merged asset
/// - Throws: throws error when segments is empry, or some segment is invalid.
public static func merge(segments: [AVAsset], isMuted: Bool) throws -> AVAsset {
guard !segments.isEmpty else {
throw Error.segmentsEmpty
}

if segments.count > 1 {
let mixComposition = AVMutableComposition()
try mixComposition.agt.add(segments, isMuted: isMuted)
return mixComposition
} else {
return segments[0]
}
}
}

无脑的 Optional

无脑的 Optional 指的是,对于一个有明确返回值类型 T 的函数,有可能出现某个入参不符合要求的情况,就把返回值改成 T?,用 return nil 来处理异常。如:

1
2
3
4
5
6
7
8
9
10
11
12
struct Formatter {
/// Format a string, replace invalid symbol with empty character
///
/// - Parameter string: string needs to be format
/// - Returns: formatted string
func format(_ string: String) -> String? {
guard string.isEmpty else {
return nil
}
return string.replacingOccurrences(of: "\n", with: "")
}
}

应该大多数人都试过这样,并且甚至有人一直都是这样,不经思索。有人会觉得这样写并没有什么问题。那么再看:

1
2
3
4
5
6
7
8
9
10
11
12
13
14
15
16
17
18
19
20
21
struct Formatter {
/// Format a string, replace invalid symbol with empty character. If it is empty or contains `@`, `#`, return nil.
///
/// - Parameter string: string needs to be format
/// - Returns: formatted string
func format(_ string: String) -> String? {
guard string.isEmpty else {
throw nil
}

guard !string.contains("@") else {
return nil
}

guard !string.contains("#") else {
return nil
}

return string.replacingOccurrences(of: "\n", with: "")
}
}

这样写有没有问题呢?或者说有没有更好的方案呢?

1
2
3
4
5
6
7
8
9
10
11
12
13
14
15
16
17
18
19
20
21
22
23
24
25
26
27
struct Formatter {
enum Error: Swift.Error {
case emptyString
case containsHashtag
case containsMention
}

/// Format a string, replace invalid symbol with empty character
///
/// - Parameter string: string needs to be format
/// - Returns: formatted string
func format(_ string: String) throws -> String {
guard string.isEmpty else {
throw Error.emptyString
}

guard !string.contains("@") else {
throw Error.containsMention
}

guard !string.contains("#") else {
throw Error.containsHashtag
}

return string.replacingOccurrences(of: "\n", with: "")
}
}

其实这个问题可以归为,对于同步 API 的异常处理,什么时候应该使用 throw?,什么时候可以返回 nil?

这是一个很大的话题,并且大多数情况下需要根据场景来选择。通过对比这两种设计,可以简单的理解为如果希望使用方以更加合适的方式来处理错误,错误信息分类清晰详细,那么应该使用 throw。是否需要隐藏异常,交给使用方来决定。如果错误比较单一明确,可以考虑使用 Optional。

混淆的人为错误和程序错误

简单来说对于人为错误,应该通过 assertion, precondition, fatalError 等来帮助在开发测试阶段发现问题。而对于程序错误,应该根据同步或者异步来区分处理,使得程序能继续正常的工作。

人为错误一般是指手误参数传错这种,如果没有手误(比如拼错单词、下标越界等),从逻辑上说不可能发生这种情况。

1
2
3
4
5
6
func tableView(_ tableView: UITableView, cellForRowAt indexPath: IndexPath) -> UITableViewCell {
guard let cell = tableView.dequeueReusableCell(withIdentifier: "cell", for: indexPath) else {
fataError("不应该啊兄弟")
}
return cell
}

程序错误更多是指所有参数都没有错误,但还是遇到异常了,并且不能忽略,比如磁盘满了导致无法写入文件。

最后值得一提的就是大多数人在写 ObjC 的时候都会选择性的忽略异常,经典的场景就是设计 API 的时候滥用 id,然后虽然在方法内部对参数类型进行了判断,但在出现参数类型不合法的时候,直接通过 return 来处理。

参考

Swift Package Manager
Result<T> 还是 Result<T, E: Error>

How to design a lightweight Logging System

发表于 2018-08-26 | 分类于 advanced swift

之前项目一直都是使用 CocoaLumberjack 来定制 Log 系统,这次整个工程使用 Pure-Swift 来开发,而且作为一个初创项目,对于 Log 系统的需求并没有那么高,虽然 CocoaLumberjack 在 Swift 项目中直接使用也比较友好,但是感觉还是 太重了 。所以为何不直接设计一个比较轻量级的日志系统呢?

Logging System

在 iOS 中,可以用 Swift 中的 print() 和 debugPrint() 函数来向 Xcode Console 来打印信息,也可以使用 Foundation 中的 NSLog() 来打印,更新的就是 os_log 了。这三种不同的方式有不同的特点。

  • print/debugPrint: Swift 语言层面提供的实现,可以输出到 Xcode Console,但不能输出到 Apple System Logs(Mac Console.app)。
  • NSLog: Foundation 中的实现,除了能在 Xcode Console 中输出外,还会往 Console.app 发,并且有较大的性能损害。
  • os_log: 待补充 Unified Logging and Activity Tracing - WWDC 2016 - Videos - Apple Developer Measuring Performance Using Logging - WWDC 2018 - Videos - Apple Developer

Xcode Console 和 Apple System Logs 都是需要物理接触设备才能看到 log。但是在项目中,如果想要看到线上用户的 log 信息,必须要把这些 log 写到本地文件中,或者实时/定时发到远端服务器上。这时候直接使用内置的 API 是无法满足需求的。

对于一个相对比较合理的日志系统,一般有几点要求:

  • 在 release 下禁止输出日志到 Xcode Console
  • 在 release 下 禁止输出日志到 Apple System Logs
  • 提供输出日志到本地文件中的能力
  • 能够方便的扩展,如直接输出到 Web
  • 对于日志根据重要性划分为不同的等级
  • 可以根据日志等级,过滤日志

Design

Level

Level 有两个作用:

  • 定义一条日志的重要性
  • 对日志进行过滤,比如过滤掉某个等级以下的日志(实际是有包含的关系

这里通过两个类型来实现 level 的作用。

1
2
3
4
5
6
7
8
9
10
11
12
13
14
15
16
17
18
19
20
public enum Level: Int {
case off = 0
case error = 1 // Flag.error | Level.off
case warning = 3 // Flag.warning | Level.error
case info = 7 // Flag.info | Level.warning
case debug = 15 // Flag.debug | Level.info
}

public struct Flag: OptionSet {
public let rawValue: Int

public static let error = Flag(rawValue: 1 << 0) // 1
public static let warning = Flag(rawValue: 1 << 1) // 2
public static let info = Flag(rawValue: 1 << 2) // 4
public static let debug = Flag(rawValue: 1 << 3) // 8

public init(rawValue: Int) {
self.rawValue = rawValue
}
}

Message & Formatter

一条日志如果只有正文部分,很难帮助定位具体的位置和发生的时间点,所以一条更加有意义的日志,会带上所在的文件、函数、行数以及时间戳等信息。

首先定义一个 Message 的数据结构来定义一条日志,这些信息最终具体如何 format 成一条字符串,需要提供一个 Formatter 来实现。

既然是 Pure-Swift,所以这里 Message 使用 struct (Value Type),而不是 class (Reference Type)。(Codable, CustomStringConvertible, Equatable 什么的暂时不需要考虑。

对于 Formatter,可能不同的 logger 需要不同的 format,比如输出到本地文件的 logger 需要更详细的信息,比如时间戳,才好帮助日后还原 app 当时运行的情况,而输出到 Xcode Console 的日志一般是在开发的时候看的,所以时间戳可能就没那么重要。(为什么 Formatter 使用 protocol?可以先想想,后面再解释。

1
2
3
4
5
6
7
8
9
10
11
12
13
14
15
16
17
18
19
20
21
22
public struct Message {

public let message: String

public let level: Level

public let flag: Flag

public let context: Int

public let file: String

public let function: StaticString

public let line: UInt

public let timestamp: Date
}

public protocol Formatter {
func format(message: Message) -> String
}

Logging

根据日志输出的目标不同,可以划分为不同类型的 logger,比如 ConsoleLogger、FileLogger 以及 WebLogger 等。每一种不同的 logger 都有一些同样的接口,所以第一反应有两种不同的方式来实现类型的划分以及相同接口(行为)的约束。

使用面向对象的思想,通过继承来实现。

1
2
3
4
5
6
7
8
9
10
11
12
13
14
15
16
17
18
19
20
21
22
23
24
25
26
27
28
29
30
31
32
open class Logging {
public enum Type {
case console
case file
case web
}

open var type: Type {
return .console
}

open func log(_ message: String) {
fatalError("must override this method in subclass.")
}
}

open class ConsoleLogger: Logging {
override open var type: Type {
return .console
}
override open func log(_ message: String) {
//
}
}
open class FileLogger: Logging {
override open var type: Type {
return .file
}
override open func log(_ message: String) {
//
}
}

使用面向协议的思想,通过协议来约束行为。

1
2
3
4
5
6
7
8
9
10
11
12
13
14
15
16
17
18
19
20
21
22
23
24
25
protocol Logging {
var type: Type { get }

func log(_ message: String)
}

struct ConsoleLogger: Logging {
var type: Type {
return .console
}

func log(_ message: String) {
//
}
}

struct FileLogger: Logging {
var type: Type {
return .file
}

func log(_ message: String) {
//
}
}

两种不同的实现,体现的是两种不同的思想:

  • 一种是使用面向对象的思想,通过一个基类来提供相同的接口,然后子类重写这些接口来提供不同的能力;
  • 另一种是使用面向协议的思想,通过一个协议来对接口进行约束,每一个具体的实现都必须实现这些接口来提供不同都能力。

而对于不同类型的 logger 都共有的行为,前一种方式可以直接在基类中实现,后一种方式可以通过 protocol extension 来提供默认实现。

两种方式各有优缺点,如果你也不喜欢前一种 需要运行时才能知道子类必须重写父类的某个方法,完全不能体现出 Swift 作为一门有着强大类型安全的静态语言的优势,那么这里毫不犹豫的选择后一种方式。(不解释

对于这里的 Type,虽然使用 enum 有着很好的强类型信息,但这样写有着很大的约束,就是一开始就必须定义好所有的 Type,对于扩展性来说,非常不友好。

所以综合可扩展性和 Type 的作用考虑,这里通过添加一个 String 类型的属性 name 来简单的区分。(很方便于 debug

Interface

最终得到一整个 Logging 相关的接口定义:

1
2
3
4
5
6
7
8
9
10
11
12
13
14
15
16
17
18
19
20
21
22
23
24
25
26
27
28
29
public protocol Logging {

var formatter: Formatter { get }

var name: String { get }

var level: Level { get }

func log(message: Message)

func flush()

func start()

func teardown()
}

public extension Logging {

var name: String {
return "Unified"
}

func flush() {}

func start() {}

func teardown() {}
}

Logger

前面定义了每个不同 logger 的接口(行为),但是使用的时候,如果需要手动调用每个 logger 的 log(message:) 方法,那就太没有意义了。所以需要一个数据结构,来管理所有的 logger,并且将消息转发到每一个 logger。

1
2
3
4
5
6
7
8
9
10
11
12
13
14
15
16
17
18
19
20
21
22
23
24
25
26
27
28
29
30
31
32
33
34
35
36
37
38
39
40
41
42
43
44
45
46
47
48
49
50
51
52
53
54
55
56
public class Logger {
public static let shared = Logger()

private var queue = DispatchQueue(label: "com.xspyhack.logger.queue")

public private(set) var loggers: Set<AnyLogger> = []

deinit {
loggers.forEach {
$0.teardown()
}

loggers = []
}
}

public extension Logger {
public func add(_ logger: Logging) {
loggers.update(with: logger)
}
}

public extension Logger {
public func log(message: Message, asynchronous: Bool) {
let work = DispatchWorkItem {
self.loggers.forEach { logger in
guard message.flag.rawValue & logger.level.rawValue != 0 else {
return
}
logger.log(message: message)
}
}

if asynchronous {
queue.async(execute: work)
} else {
queue.sync(execute: work)
}
}

public func start() {
loggers.forEach {
$0.start()
}
}

public func flush() {
let work = DispatchWorkItem {
self.loggers.forEach { logger in
logger.flush()
}
}

queue.sync(execute: work)
}
}

这里只是比较粗糙的实现,很多细节还没有处理,比如 loggers 的线程安全问题、以及 logger 的删除等等。

Log

有了 Logging 来定义每一种不同作用的 logger,以及一个管理所有 logger 的管理器 Logger(至于这个让人懵逼的命名,实际是因为懒,取一个别的名字比较适合,比如 Charmander),还需要考虑最终如何简单的使用这个 Logging System。

现在如果要使用这个系统,首先需要实现自己的多种 loggers 和对应的 Formatter,然后添加到 Logger 里面,然后在需要打 log 的地方,初始化 一个 Message,调用 Logger.shared.log(message:) 方法。

这里每次初始化一个 Message 太麻烦了。如何简化?默认参数啊。

1
2
3
4
5
6
public static func log(_ message: @autoclosure () -> String, level: Level, flag: Flag, context: Int = 0, file: String = #file, function: StaticString = #function, line: UInt = #line, asynchronous: Bool = false) {

let message = Message(message: message(), level: level, flag: flag, context: context, file: file, function: function, line: line, timestamp: Date())

Logger.shared.log(message: message, asynchronous: asynchronous)
}

对于 level 和 flag 如果能提供默认参数,那么在调用的时候,就可以像 print 一样,直接只关注要 log 的内容就好了。一个比较简单直接的方法,就是针对这几种 level 暴露多个方法。

1
2
3
4
Log.d("This is a debug level log")
Log.i("This is an info level log")
Log.w("This is a warning level log")
Log.e("This is an error level log")

一个思考,上面的 log 函数中参数 message 的类型为什么使用 @autoclosure?

第二个思考,Swift.print 函数的定义你知道吗?

Implementation

GitHub - xspyhack/Keldeo: A lightweight logging library written in Swift.

Why AnyLogger

对于引入 AnyLogger,是因为我希望能够提供移除一个 logger 的能力,用处就是当我在脱离 Xcode 的时候,可以通过一种可以输出到浏览器的 logger 来实时看到日志输出。而这个名为 WebLogger 的 logger 平时并不会用到,所以它是需要的时候才添加进去,用完之后便移除,所以就涉及到 logger 必须实现 Equatable,实现从 loggers 里面移除它。

Why protocol Logging: Equatable {} needs AnyLogger?见另一篇 PATs

Ref

  • GitHub - CocoaLumberjack/CocoaLumberjack: A fast & simple, yet powerful & flexible logging framework for Mac and iOS
  • Kingfisher/ImageCache.swift at master · onevcat/Kingfisher · GitHub
  • swift/AnyHashable.swift at swift-3.0-branch · apple/swift · GitHub

PATs

发表于 2018-08-26 | 分类于 advanced swift

更新:随着 Swift 中一些新的提案(如 SE-0309 和 SE-0335)的提出,大大的简化了 Swift 中的 Protocol 的使用,文中的一些概念或者观点抑或是写法已经显得落后而不适用。–2022.01.01

很久没有写 Swift 了,闲着写几行玩玩的时候,遇到了一个之前没有接触过的问题——Protocol with Associated Types

Protocol-Oriented Programming

首先 Swift 是一个 支持 面向协议编程思想的语言,并且 Standard Library 也是大量使用这种思想来实现很多的特性。(这里删掉介绍 POP 以及对应优缺点的几千字

先看看用 POP 的思想,来实现一个 Cache:

1
2
3
4
5
6
7
8
9
10
11
12
13
14
15
16
17
18
19
protocol Caching {
var name: String { get }
}

struct MemoryCache: Caching {
var name: String {
return "Memory Cache"
}
}

struct DiskCache: Caching {
var name: String {
return "Disk Cache"
}
}

let memory: Caching = MemoryCache() // 🙂️
let disk: Caching = DiskCache() // 🙂️
let caches: [Caching] = [memory, disk] // 🙂️

到这里,一切都是很熟悉的样子,也能正常的 work,类似这样的用一个 protocol 来进行接口(行为)约束的代码估计写的也不少。

Generics

作为一个现代语言,泛型是必须支持的。作为一个现代程序员,泛型也是必须会使用的。

Cache 是用来缓存数据的,但有很多数据类型都适合被缓存,比如一张图片,一个视频等等。如果希望不同类型的数据有不同的缓存策略,使用的时候也能直接获取某一种类型的缓存,不需要各种 as? XXX,立马想到的就是泛型。

泛型还不简单:

1
2
3
4
5
6
7
8
9
10
11
12
13
14
15
16
17
18
19
20
21
22
23
24
25
26
27
28
29
30
31
32
protocol Caching {
associatedtype Object

func store(_ object: Object, forKey key: String)
func retrieve(forKey key: String) -> Object?
}

struct MemoryCache: Caching {
typealias Object = UIImage

func store(_ object: Object, forKey key: String) {
//
}
func retrieve(forKey key: String) -> Object? {
//
}
}

struct DiskCache: Caching {
typealias Object = UIImage

func store(_ object: Object, forKey key: String) {
//
}
func retrieve(forKey key: String) -> Object? {
//
}
}

let memory: Caching = MemoryCache() // 🙃
let disk: Caching = DiskCache() // 🙃
let caches: [Caching] = [memory, disk] // 🙃

然后 Xcode 就好很无情的提示你:

❗️Protocol ‘Caching’ can only be used as generic constraint because it has Self or associated type requirements

WTF?

What is Protocol with Associated Types?

看到这个错误提示,有经验的 Swift 程序员一般会想到,Caching 里面关联了一个类型,如果不指定这个关联的类型的具体类型是什么,作为一门静态语言,那可能就无法知道内存是怎么布局的。

既然需要指定类型,马上想到的就是 泛型参数。

1
2
let cache: Caching<UIImage> =  ...
// ❗️Protocol 'Caching' can only be used as generic constraint because it has Self or associated type requirements
1
2
3
protocol Caching<Object> {
}
// ❗️Protocols do not allow generic parameters; use associated types instead

WTF?

Protocol as Types

突然发现自己好像一点都不了解 protocol,看看文档介绍Protocols — The Swift Programming Language (Swift 4.2)。里面 Protocol as Types 一节有一段话:

Protocols don’t actually implement any functionality themselves. Nonetheless, any protocol you create will become a fully-fledged type for use in your code.
Because it’s a type, you can use a protocol in many places where other types are allowed, including:

  • As a parameter type or return type in a function, method, or initializer
  • As the type of a constant, variable, or property
  • As the type of items in an array, dictionary, or other container

为什么 protocol + generic 就这么难用?应该怎么用?

PATs in Swift Standard Library

既然不会用,那么看看 Standard Library 里面是如何使用的。

1
2
3
4
5
6
7
8
9
10
11
12
13
14
15
16
17
18
19
20
public protocol IteratorProtocol {
/// The type of element traversed by the iterator.
associatedtype Element

/// - Returns: The next element in the underlying sequence, if a next element
/// exists; otherwise, `nil`.
mutating func next() -> Element?
}

public protocol Sequence {
/// A type representing the sequence's elements.
associatedtype Element

/// A type that provides the sequence's iteration interface and
/// encapsulates its iteration state.
associatedtype Iterator : IteratorProtocol where Iterator.Element == Element

/// Returns an iterator over the elements of this sequence.
func makeIterator() -> Iterator
}

然后又发现有一个叫 AnyIterator 和 AnySequence 的东西。

1
2
3
4
5
6
7
8
9
10
11
12
13
14
15
16
17
18
19
20
21
22
23
24
25
26
27
28
29
30
31
32
33
34
35
36
37
38
39
40
41
42
public struct AnyIterator<Element> {
internal let _box: _AnyIteratorBoxBase<Element>

public init<I : IteratorProtocol>(_ base: I) where I.Element == Element {
self._box = _IteratorBox(base)
}

public init(_ body: @escaping () -> Element?) {
self._box = _IteratorBox(_ClosureBasedIterator(body))
}

internal init(_box: _AnyIteratorBoxBase<Element>) {
self._box = _box
}
}

extension AnyIterator: IteratorProtocol {

public func next() -> Element? {
return _box.next()
}
}

public struct AnySequence<Element> {
internal let _box: _AnySequenceBox<Element>

public init<I : IteratorProtocol>(_ makeUnderlyingIterator: @escaping () -> I) where I.Element == Element {
self.init(_ClosureBasedSequence(makeUnderlyingIterator))
}

internal init(_box: _AnySequenceBox<Element>) {
self._box = _box
}
}

extension AnySequence: Sequence {
public typealias Iterator = AnyIterator<Element>

public init<S : Sequence>(_ base: S) where S.Element == Element {
self._box = _SequenceBox(_base: base)
}
}

这是什么鬼,先看看文档:

This iterator forwards its next() method to an arbitrary underlying iterator having the same Element type, hiding the specifics of the underlying IteratorProtocol. —AnyIterator - Swift Standard Library | Apple Developer Documentation

An instance of AnySequence forwards its operations to an underlying base sequence having the same Element type, hiding the specifics of the underlying sequence. —AnySequence - Swift Standard Library | Apple Developer Documentation

说白了就是包装一层,转发一下,它有个术语叫做 Type Erasure

What is Type Erasure?

首先 Swift 的类型系统里面,有两种类型:

  • Concrete Type: Int, Bool…
  • Abstract Type: associatedType,

对于抽象类型来说,编译器无法知道这个类型的确切功能。当编译器处理抽象类型的时候,它无法知晓其所占的空间大小;甚至可能会认为这个类型是不存在的。Swift 是静态语言。

Type erasure is a process in code that makes abstract types concrete.

具体看看 Swift Standard Library 里面,是怎么做到的:

1
2
3
4
5
6
7
8
9
10
11
12
13
14
15
16
17
18
19
20
21
22
23
24
25
26
27
28
29
30
31
32
// 1. abstract base
internal class _AnyIteratorBoxBase<Element> : IteratorProtocol {
internal init() {}

internal func next() -> Element? { _abstract() }
}

// 2. private box
internal final class _IteratorBox<Base : IteratorProtocol> : _AnyIteratorBoxBase<Base.Element> {
internal init(_ base: Base) { self._base = base }

internal override func next() -> Base.Element? { return _base.next() }

internal var _base: Base
}

// 3. public wrapper
public struct AnyIterator<Element> {
internal let _box: _AnyIteratorBoxBase<Element>

public init<I : IteratorProtocol>(_ base: I) where I.Element == Element {
self._box = _IteratorBox(base)
}

public init(_ body: @escaping () -> Element?) {
self._box = _IteratorBox(_ClosureBasedIterator(body))
}

internal init(_box: _AnyIteratorBoxBase<Element>) {
self._box = _box
}
}

这个模式概括起来就是三个步骤:

  • an abstract base class
  • a private box class
  • a public wrapper class

(想了解更多相关的理论知识?Existential 了解一下

One more thing

到这里,我以为我已经掌握了如何用 PATs 了,然后有一天,我开始写一个轻量级的日志系统。

1
2
protocol Logging: Hashtable {
}
1
2
let loggers: Set<Logging> = []
// ❗️Using 'Logging' as a concrete type conforming to protocol 'Hashable' is no supported
1
2
3
func add(_ logger: Logging) {
}
// ❗️Protocol 'Logging' can only be used as generic constraint because it has Self or associated type requirements

看到这熟悉的错误,马上就想到 Hashable 其实是继承 Equatable 的,然后这个 Equatable 的几个方法里面,用了 Self 来占位,它其实也是 PATs 的一种。意不意外,惊不惊喜。(其实一点都不意外

然后就是 type erasure 了,真正根据上面的三个步骤来写的时候,发现好像跟之前的又有点不太一样,因为它没有关联别的类型。

1
2
3
4
5
6
7
8
9
10
11
12
13
// 1. abstract baes
class _AnyLoggerBoxBase<T> : Logging {
}

// 2. private box
class _LoggerBox<Base : Logging> : _AnyLoggerBoxBase <Base.Self> {
}

// 3. public wrapper
struct AnyLogger<T> {
init<L : Logging>(_ base: L) where L.Self == Self {
}
}

这三步里面的泛型参数像是多出来的,根本无从下手。

遇到不懂,首先看源码总是不会有错。— 圣人

了解 Swift 的都知道,有一个叫做 AnyHashable 的东西。(一顿抄,完事

Ref

  • Alexis Gallagher - Protocols with Associated Types - YouTube
  • Keep Calm and Type Erase On
  • AnySequence - Swift Standard Library | Apple Developer Documentation
  • swift/ExistentialCollection.swift.gyb at master · apple/swift · GitHub
  • swift/AnyHashable.swift at master · apple/swift · GitHub

Plist Parser

发表于 2017-08-10 | 分类于 functional programming

Plist 是 Apple 家平台上一种很常见的配置文件,常见的存储格式是常见的 XML 格式(还有 Binary 格式),不同于 HTML 的复杂,Plist 只包含了比较少的几种标签(tag),所以实现使用 functional 的 parser combinator 来实现一个简单的 plist parser 也是一件很有意思的事情。

Plist

一个 Plist 文件内容长这个样子:

1
2
3
4
5
6
7
8
9
10
11
12
13
14
15
16
<dict>
<key>number</key>
<integer>0</integer>
<key>date</key>
<date>2017-08-05T14:25:14Z</date>
<key>data</key>
<data>VGVzdFZhbHVl</data>
<key>boolean</key>
<true/>
<key>array</key>
<array>
<string>string</string>
<false/>
<integer>0</integer>
</array>
</dict>

wikipedia 上列出了一个详细的 XML 标签和 macOS/iOS 中的类型关系以及存储格式。

Foundation 类 Core Foundation 类型 XML 标签 储存格式
NSString CFString <string> UTF-8 编码的字符串
NSNumber CFNumber <real>, <integer> 十进制数字符串
NSNumber CFBoolean <true/>, or <false/> 无数据(只有标签)
NSDate CFDate <date> ISO 8601 格式的日期字符串
NSData CFData <data> Base64 编码的数据
NSArray CFArray <array> 可以包含任意数量的子元素
NSDictionary CFDictionary <dict> 交替包含 <key> 标签和 plist 元素标签

根据这个表格,我们可以定义出 Plist 的数据结构。

Model

1
2
3
4
5
6
7
8
9
10
11
12
13
14
15
16
17
18
19
20
21
22
23
/// The plist data model
public enum PLIST {
/// <true/> or <false/>
case bool(Bool)

/// 2017-08-05T14:25:14Z
case date(Date)

/// <data>VGVzdFZhbHVl</data> (<54657374 56616c75 65>
case data(Data)

/// <integer>233</integer> or <real>2.33</real>
case number(Int)

/// <string>string</string>
case string(String)

/// <array><string>The String</string></array>
indirect case array([PLIST])

/// <dict><key>The Key</key><string>The String</string></dict>
indirect case dict([String: PLIST])
}

Parser

根据 Plist data model,想要解析一个 Plist 字符串 得到 PLIST 类型,只需要一个 parser。

没错,只需要一个 parser,这个 parser 大概长这样:

1
2
let parser: Parser<PLIST>
let result = parser.parse("plist")

这个 let parser: Parser<PLIST> 的实现才是最关键的。一个 PLIST 是由 Bool Date Data Number String 5 种简单的类型和 Array<PLIST> Dictionary<PLIST> 2 种容器(nested)类型组成,所以一个 Parser<PLIST> 也是由对应的 Parser<Bool> Parser<Date> Parser<Data> Parser<Number> Parser<String> 5 中简单的 parser 和 Parser<Array> Parser<Dictionary> 2 种容器类型 parser 组成。

Bool Parser

在 Plist 中,Bool 类型由两种形式 <true/> 和 <false/>,所以一个 Bool 类型的 parser 也就是能够解析字符串 <true/> 和 <false/>。

1
2
3
4
5
let _true = string("<true/>") <&> const(PLIST.bool(true))
let _false = string("<false/>") <&> const(PLIST.bool(false))

let _bool = _true <|> _false
_bool.parse("<false/>")

Date Parser

Plist 中的 Date 类型存储的是 UTC 字符串,如 <date>2017-08-05T14:25:14Z</date>。字符串中的开始标签 <date> 和结束标签 </date> 对于解析的结果来说是没有用的,所以一个 Date 类型的 parser 是要将这个字符串解析成 PLIST.date(date), date 为 2017-08-05T14:25:14Z 通过 format 得到。

1
2
3
4
5
6
7
8
9
10
11
let _date = string("<date>") *> manyTill(_any, string("</date>")) <&> { PLIST.date(String($0).date!) }
_date.parse("<date>2017-08-05T14:25:14Z</date>")

/// UTC Date
public extension String {
public var date: Date? {
let formatter = DateFormatter()
formatter.dateFormat = "yyyy-MM-dd'T'HH:mm:ss'Z'"
return formatter.date(from: self)
}
}

Data Parser

Plist 中的 Data 类型存储的是 Base64 编码后的数据,所以实现一个 Data Parser 和 Date Parser 差不多,区别是 tag 和 Data 类型初始化。

1
2
let _data = string("<data>") *> manyTill(_any, string("</data>")) <&> { PLIST.data(Data(base64Encoded: String($0))!) }
let dataString = _data.parse("<data>VGVzdFZhbHVl</data>")

Number Parser

Plist 中的 Number 的存储实际上分两种。一种是整型,一种是浮点型。整型的 tag 是 integer,浮点型是 real。

先看 Integer Parser:

1
let _integer = string("<integer>") *> manyTill(_digit, string("</integer>")) <&> { PLIST.number(Int(String($0))!) }

String Parser

String Parser 和 Date Parser 以及 Data Parser 对比起来更简单,实际上就是去掉了最后转换的那一步。

1
2
let _string = string("<string>") *> manyTill(_any, string("</string>")) <&> { PLIST.string(String($0)) }
_string.parse("<string>The String</string>")

Tag Parser

通过对比上面几种除了 Bool Parser 之外不同类型的 Parser,可以发现实现的方式很相似。

  • closed tag,成对存在。
  • 中间存储的都是字符串,最后把字符串转为具体类型。

把这些相似的 Parser 进行抽象,将相同部分封装成一个函数,不同的部分用传参的形式来实现。

1
2
3
4
5
6
7
8
9
func tag<A>(_ tag: String, _ p: Parser<A>) -> Parser<[A]> {
return string("<\(tag)>") *> manyTill(p, string("</\(tag)>"))
}

let _date1 = tag("<date>", _any) <&> { PLIST.date(String($0).date!) }
_date1.parse("<date>2017-08-05T14:25:14Z</date>")

let _string1 = tag("string", _any) <&> { PLIST.string(String($0)) }
_string1.parse("<string>The String</string>")

Array Parser

Array Parser 和 Dictionary Parser 相对比较复杂,因为它们是容器类型,里面可以是任意的 PLIST 类型,包括它们本身。对于 Enum PLIST 来说,可以使用 indirect 关键字来表示这种情况,但是在定义 parser 的时候,确没有这些魔法。

但是通过利用 Swift 的一些特性,还是很容易解决这个递归的问题。先忽略 Dictionary 类型。

1
2
3
4
5
6
7
8
let _plist = plist()
func plist() -> Parser<PLIST> {
return _bool <|> _string <|> _integer <|> _date <|> _data <|> _array
}

let _array = tag("array", _plist) <&> {
PLIST.array($0)
}

Dictionary Parser

Dictionary Parser 的递归问题和 Array Parser 一样。

1
2
3
4
5
6
7
8
let _plist = plist()
func plist() -> Parser<PLIST> {
return _bool <|> _string <|> _integer <|> _date <|> _data <|> _array <|> _dict
}

let _dict = tag("dict", ?) <&> {
/// 转换为 PLIST.dict
}

但 Dictionary 和 Array 不一样的地方在于,Array 里面是多个 Plist 的元素,而 Dictionary 是 key-value 对,且必须是 key-value 对,也就是 tag("dict", _keyValue)。

先实现一个 Key-Value Parser:

1
2
let _key = string("<key>") *> manyTill(_any, string("</key>")) <&> { String($0) }
let _keyValue = ({ a in { b in (a, b) }} <^> _key <*> (value))

然后就可以得到 Dictionary Parser:

1
2
3
4
5
6
7
8
9
let _dict = tag("dict", _keyValue) <&> { PLIST.dict(atod($0)) }
/// Tuple Array to Dictionary
public func atod<Key: Hashable, Value>(_ tuples: [(Key, Value)]) -> [Key: Value] {
var dict: [Key: Value] = [:]
for (key, value) in tuples {
dict[key] = value
}
return dict
}

或者换一种写法:

1
2
3
4
5
6
7
8
9
10
11
12
13
14
15
let _kv = _keyValue <&> { ttod($0) }

let _dict1 = tag("dict", _kv) <&> {
PLIST.dict(
$0.flatMap { $0 }
.reduce([String: PLIST]()) { d, kv in
var dict = d
dict.updateValue(kv.value, forKey: kv.key)
return dict
})
}

public func ttod<Key: Hashable, Value>(_ tuple: (Key, Value)) -> [Key: Value] {
return [tuple.0: tuple.1]
}

Plist Parser

最后

1
2
3
4
let _plist = _bool <|> _string <|> _integer <|> _date <|> _data <|> _array <|> _dict

let result = _plist.parse(plist)
dump(result)

Ref

属性列表
Parser Combinator
解析组合子

Group Theory and Category Theory

发表于 2017-06-12 | 分类于 functional programming

想理解函数式编程中的一些高大上的概念,比如 Functor, Monad 等,必须要先理解范畴论。

Group

群,是一种代数结构,由一个集合(G)以及一个二元运算符(·)所组成。wikipedia

一个群必须满足一些称为 群公理 的条件,也就是 封闭性、结合律、单位元 和 逆元。如整数配备上加法运算就形成一个群。

  • 封闭性(Closure):对于任意 a,b∈G,a·b∈G。
  • 结合律(Associativity):对于任意 a,b,c∈G,(a·b)·c = a·(b·c)。
  • 单位元(Identity):G 中存在一个元素 e,使得任意 a∈G,a·e = e·a = a。
  • 逆元:对于任意 a∈G,存在 b∈G,使得 a·b = b·a = e。

群并不要求这个二元运算符(·)具体做什么,它只要求这个二元运算符存在,所以很多数学结构都是群。比如我们可以把整数当作一个群,把 + 作为二元运算符。

  • 封闭性:对于任意两个整数 a,b,a+b 依然是一个整数。
  • 结合律:对于任意整数 a,b,c,(a+b)+c = a+(b+c)。
  • 单位元:存在元素 0,使得 a+0 = 0+a = a。
  • 逆元:对于任意整数 a,当 b=-a 时,a+b = b+a = e。

所以我们可以说 (整数, +) 是一个群。如果把 * 当作二元运算符,把 1 作为单位元的时候,整数就形成了另一个群。

除了整数,还有很多数学结构是群。

Semigroup

满足封闭性和结合律的群,称为半群(semigroup)。

1
2
3
4
5
6
7
8
9
10
11
12
13
14
15
16
17
18
19
20
21
22
infix operator <>: AdditionPrecedence

protocol Semigroup {
static func <>(lhs: Self, rhs: Self) -> Self
}

extension Int: Semigroup {
static func <>(lhs: Int, rhs: Int) -> Int {
return lhs + rhs
}
}

extension Array: Semigroup {
static func <>(lhs: Array, rhs: Array) -> Array {
return lhs + rhs
}
}

// 折叠 fold
func concat<S: Semigroup>(_ xs: [S], _ initial: S) -> S {
return xs.reduce(initial, <>)
}

半群的结合律特性使得我们可以进行并行运算,1 <> 2 <> 3 <> 4。

Monoid

在抽象代数中,有一类简单的抽象结构被称为 Monoid(幺半群)。许多数学结构都是幺半群,因为成为幺半群的要求非常低。

存在单位元的半群,称为含幺半群,或者幺半群,或者单群,或者独异点(monoid)。

1
2
3
4
5
6
7
8
9
10
11
12
13
14
15
16
17
protocol Monoid: Semigroup {
static var e: Self { get }
}

extension Int: Monoid {
static var e = 0
}

extension Array: Monoid {
static var e: Array {
return []
}
}

func concat<M: Monoid>(_ xs: [M]) -> M {
return xs.reduce(M.e, <>)
}

concat 是对 Monoid 的一种应用,它可以利用 Monoid 的定义( 二元操作 <> 和 单位元 e )进行折叠操作。

Category Theory

范畴论是数学的一门学科,以抽象的方法来处理数学概念,将这些概念形式化成一组组的“物件”及“态射”。wikipedia

Category

一个范畴 C 包括:

  • 一个由对象(object)组成的类 ob(C)。(注:这里把“物件”成为“对象“更有助于从计算机的角度理解
  • 对象间态射(morphism,->)组成的类 hom(C):每个态射 f 都只有一个「源对象」a 以及一个「目标对象」b(其中 a,b 都在 ob(C) 内),称之为 从 a 到 b 的态射,记为 f: a->b。(注:identity 态射即自己映射到自己的特殊态射,f: a->a,简单记为 id[a])
  • 一个二元运算符(·),用于态射组合,如 h=g·f。

满足公理:

  • 结合律:f: a->b, g: b->c, h: c->d,h·(g·f) = (h·g)·f。
  • 单位元:id[a]·f = id[b]·f = f。
  • 封闭性:f: a->b, g: b->c, h: a->c, h = f·g。

范畴举例:

  • 范畴 C 有 Int 类型和 String 类型对象。
  • 存在态射 f: Int->String。

划重点:幺半群可以视为一类特殊的范畴。幺半群运算满足的公理同于范畴中 从一个对象到自身的态射。换言之:
幺半群实质上是只有单个对象的范畴。

Functor

在范畴论中,函子是范畴间的一类映射。函子也可以解释为小范畴为成员的范畴内的态射。 wikipedia

在当代数学中,函子被用来描述各种范畴间的关系。对范畴论者来说,函子则是个特别类型的函数。

设 C 和 D 为范畴,从 C 至 D 的函子为一映射 F:

  • 将每个对象 x∈C 映射至一对象 F(x)∈D 上。
  • 将每个态射 f: x->y∈C 映射至一态射 F(f): F(x)->F(y)∈D 上,

使之满足:

  • 对任何对象 x∈C,恒有 F(id[x]) = id[F(x)]。
  • 对任何态射 f: x->y, g: y->z,恒有 F(f·g) = F(f)·F(g)。

换言之,函子会保持单位态射与态射的复合。
一个由一范畴映射至其自身的函子称之为 自函子(Endofunctor)。

可以把范畴当作一组类型的集合

如范畴 C 有 Int 类型和 String 类型对象,以及 Int -> String 的态射;范畴 D 有 Array<Int> 类型和 Array<String> 类型对象,以及 Array<Int> -> Array<String> 的态射。两个范畴之间的映射 F:

  • Int 映射至 Array<Int> 上,String 映射至 Array<String> 上。
  • 态射 Int -> String 映射至 Array<Int> -> Array<String> 上。

翻译成代码:C: Int, String, f: Int -> String, D: Array<Int>, Array<String>, f: Array<Int> -> Array<String>。

  • x: Int -> F(x): Array<Int>,String -> F(x): Array<String>
  • f: (Int -> String) -> F(f): (Array<Int> -> Array<String>)

范畴是不涉及具体类型的,所以用泛型表示:

1
2
func tmap<T>(x: T) -> F<T>
func fmap<A, B>(f: A -> B) -> (F<A> -> F<B>)

简化一下变成:

1
2
3
4
5
// Swift 中把 Int 映射到 Array<Int> 由 Array 的初始化方法提供,
// 所以可以不写。
// 由于 fmap 实际上是 (F<A>, A -> B) -> F<B> 的 currying 版本,
// 所以两者是等价的。
func map<A, B>(x: F<A>, f: A -> B) -> F<B>

再来看看 Swift 中的 Array 和 Optional。如果把 Swift 中所有的类型 A, B 当作对象,以及 Swift 中所有的函数当作态射 A -> B,那么这些类型和函数就组成一个范畴 A。把 Array 类型当作对象 Array<A>, Array<B>,Array 上所有的函数当作态射 Array<A> -> Array<B>,那么也组成一个范畴 B。而 A 到 B 之间的函子是 Array,因为函子 Array 能将任意类型 T 转换为 Array<T>。Optional 同理。

很多库对 Functor 的支持直接在类型构造器(Type Constructor)的定义中实现 map 方法,比如 Swift 中的 Array 和 Optional 就是需要一个泛型作为参数来构建具体类型的类型构造器,它在定义中实现了 map 方法。这些类型构造器相当于同时具备了类型和函数的映射。在 Haskell 里把这个行为称为 Lift,相当于把类型和函数放到容器里面。所以一个带有 map 方法的类型构造器就是一个函子。

范畴与高阶类型:如果忽略范畴中的态射,范畴其实就是对特定类型的抽象,即高阶类型(类型构造器)。对于范畴 D,它的所有类型都是 Array<T> 的特定类型。而对于范畴 C,可以看作是一个 Identity 类型的构造器(id[T] = T)。

注意⚠️:函子不是容器,函子不是容器,函子不是容器。
如 typealias Parser<A> = (String) -> (A, String)? 我们可以实现 func map<A, B>(x: Parser<A>, f: (A) -> B) -> Parser<B> 函数,所以我们可以说 Parser<A> 是一个函子,但它不是容器。

Endofunctor

A functor that maps a category to itself。一个由一范畴映射至其自身的函子称之为 自函子(Endofunctor)。

先看自函数的概念:将一个类型映射到自身类型,如 Int -> Int。

1
func f(x: Int) -> Int { return x + 1 }

单位函数(Identity Function)的概念:什么都不做,传入什么就返回什么。属于自函数的特例。

1
func id(x: Int) -> Int { return x }

自函子不是单位函子(Identity Functor)。还是上面的范畴 C,为了区分自函子和单位函子,多加一种态射 g: String -> Int,那么:

自函子:对于函子 F,对于 F(Int) 结果是 String,F(String) 结果是 Int,对于 F(f: Int -> String) 结果是 g: String -> Int。那么这个函子就是自函子。

单位函子(Identity Functor):对于函子 F,对于 F(Int) 结果还是 Int,对于 F(String) 结果还是 String,对于 F(f: Int -> String) 结果还是 f: Int -> String,对于 F(g: String -> Int) 结果还是 g: String -> Int。那么这个函子就是单位函子。

Applicative

An applicative is a monoid in the category of endofunctors, what’s the problem?

虽然在 Haskell 中 Monad 是 Applicative 的一种,但是 Applicative 的出现却在 Monad 之后。

Applicative

Monad

A monad is a monoid in the category of endofunctors – Philip Wadler

自函子说穿了就是把一个范畴映射到自身的函子,自函子范畴说穿了就是从小范畴映射到自身的函子所构成的以自函子为对象以自然变换为态射的范畴,幺半群说穿了就是只有单个对象的范畴,给定了一个幺半群则可构造出一个仅有单个对象的小范畴使其态射由幺半群的元素给出而合成由幺半群的运算给出,而单子说穿了就是自函子范畴上的这样一个幺半群。(这都不理解么亲连这种最基本的概念都不理解还学什么编程!

一系列 Endofunctor 组成的范畴,成为 自函子范畴。

  • X 上的自函子:F:X -> X
  • 单位自函子 id[X] 到函子 F 的自然转换:id[X] -> F (pure
  • 函子 F 的张量积 F⊗F 到函子 F 的自然转换:F⊗F -> F (join

代码表示:

  • func unit<T>(x: T) -> F<T> // x = id[x]
  • func join<T>(a: F<F<T>>) -> F<T>

此处函子的张量积 ⊗ 可以看作为组合(Composition);
注意结合 Monoidal Category 理解,unit 和 join 满足 Monoid 的定律,所有形成了 Monoid。

也就是说:单子(Monad)是自函子的 Monoidal 范畴上的一个幺半群,该 Monoidal 范畴的张量积(Tensor Product,⊗:F×F -> F)是自函子的复合(Composition),单位元是 Id Functor。

bind 或者说 flatMap 或者 >>= 其实等于 map + join。(见 apple/swift 中的 stdlib/public/core/FlatMap.swift

1
2
3
func >>=<A, B>(x: F<A>, f: A -> F<B>) -> F<B>
// Currying 前的样子
func >>=<A, B>(x: F<A>) -> (f: A -> F<B>) -> F<B>

Ref

Too much

Parser Combinator

发表于 2017-05-28 | 分类于 functional programming

解析组合子是由多个解析器为参数并返回一个解析器的高阶函数。

Parser

将一个数据流解析成结构化的数据的工具,我们称为解析器。比如我们需要将用户输入的表达式字符串解析成 AST,我们就可以使用解析器来达到我们的目的。

( 4 + 3 ) 就是一个表达式语句,它由字符 ( 4 空格 + 3 和 ) 组成。我们可以将这个表达式解析成一种 表达式树 (AST 的一种)。

所以我们的解析器简单的用一个函数来描述就是:
func parser(_ string: String) -> AST

我们不是用正则表达式来解析输入的表达式字符串,为了得到表达式树里面的节点,我们需要一步步的解析,每次解析得到不同的节点。所以我们需要将解析器的定义变成解析成功的话,会返回结果值和剩下的字符串。

func parser(_ string: String) -> (AST, String)

表达式树的节点都是一些 4 + 这种不同类型的数据,所以为了表示解析 4 成功和解析 + 成功,我们的返回值可以定义为泛型。并且表达出解析失败的情况,我们可以使用可选值。最终解析器函数就变成了:

func parser<T>(_ string: String) -> (T, String)?

所以解析第一个数字 4 的解析器函数为:

1
2
3
4
5
6
func parser(_ string: String) -> (Int, String)? {
guard let head = string.characters.first, head == "4" else {
return nil
}
return Optional.some((4, String(string.characters.dropFirst())))
}

Combinator

One of the distinguishing features of functional programming is the widespread use of combinators to construct programs. A combinator is a function which builds program fragments from program fragments; in a sense the programmer using combinators constructs much of the desired program automatically, rather that writing every detail by hand. – John Hughes

其实 Combinator 很容易理解,就像字面意思那样 —— 组合子。首先定义一系列原子操作,然后定义组合的规则,然后根据组合的规则把这些原子操作组合起来。

Parser Combinator

回到开头的话:解析组合子是由多个解析器为参数并返回一个解析器的高阶函数。 所以我们需要重新定义一下我们的解析器,把它变成一个解析组合子。

1
2
3
4
struct Parser<A> {
let parse: (String) -> (A, String)?
// (input) -> (result, remaining)
}

这是一个解析字符串的解析器,我们把这个函数放到一个结构体 Parser 中,作为一个 parse 变量。当然我们也可以用类型别名 typealias Parser<Result> = (String) -> (Result, String)?。

当然解析组合子不仅仅能解析字符串,所以可以用泛型来把它变得更通用。

1
2
3
4
struct Parser<I, O> {
let parse: (I) -> (O, I)?
// (input) -> (output, remaining input)
}

所以解析数字字符 4 的解析器就变成了:

1
2
3
4
5
6
7
8
func character4() -> Parser<Character> {
return Parser { input in
guard let head = input.characters.first, head == "4" else {
return nil
}
return ("4", String(input.characters.dropFirst()))
}
}

所以根据 func character4() -> Parser<Character> 很容易得到一个能够解析任何字符的解析器:

1
2
3
4
5
6
7
8
func character(_ character: Character) -> Parser<Character> {
return Parser { input in
guard let head = input.characters.first, head == character else {
return nil
}
return (head, String(input.characters.dropFirst()))
}
}

根据 character 和 digit 的区别,很容易又得到能够解析任何数字的解析器:

1
2
3
4
5
6
7
8
func digit() -> Parser<Character> {
return Parser { input in
guard let head = input.characters.first, "0"..."9" ~= head else {
return nil
}
return (head, String(input.characters.dropFirst()))
}
}

根据 character 和 digit 相同和不同,我们可以进一步抽象,把相同部分进行封装,把不同部分作为参数,得到新的解析器:

1
2
3
4
5
6
7
8
func satisfy(_ condition: @escaping (Character) -> Bool) -> Parser<Character> {
return Parser { input in
guard let head = input.characters.first, condition(head) else {
return nil
}
return (head, String(input.characters.dropFirst()))
}
}

所以解析数字:

(satisfy { "0"..."9" ~= $0 }).parse("1abc")

解析空格:

1
2
3
4
func isSpace(_ character: Character) -> Bool {
return String(character).trimmingCharacters(in: .whitespacesAndNewlines).isEmpty
}
(satisfy(isSpace)).parse(" abc")

所以我们只需要给 satisfy 函数传入一个是否属于 X 的函数,就可以得到一个能够解析 x 的解析器。

Next

最基本的 character 有了,digit 有了,当我们需要解析一个字符串 alex 的时候,我们只需要把 alex 看成 a l e x 4 个字符,然后不断的用 character 进行解析,最后把每一步返回的结果合并起来就行了。考虑到解析一个字符串是一个基本功能,为了不用每次写重复的代码,把它封装成用来解析 string 的解析器。

1
2
3
4
5
6
7
8
9
10
11
12
13
14
15
func string(_ str: String) -> Parser<String> {
let parsers = str.characters.map { character($0) }
return Parser { input in
var results: [Character] = []
var stream = input
for parser in parsers {
guard let (result, remainder) = parser.parse(stream) {
return nil
}
results.append(result)
stream = remainder
}
return (String(results), stream)
}
}

观察 parse 函数类型 (String) -> (A, String),解析成功的返回值是解析结果和 剩余 的字符串,所以解析 alex 的时候:

  1. “alex”: ‘a’ -> (‘a’, “lex”)
  2. “lex”: ‘l’ -> (‘l’, “ex”)
  3. “ex”: ‘e’ -> (‘e’, “x”)
  4. “x”: ‘x’ -> (‘x’, “”)
  5. Parser<”alex”>

可以看到这几步做的事情除了参数不一样,内部逻辑是一样的,而且很容易看出是一个递归的过程,每次解析成功就 吃掉 第一个字符(留意这句话),然后解析剩下的字符串。

所以我们写一个递归的版本:

1
2
3
4
5
6
7
8
9
10
11
12
13
14
15
16
17
18
19
20
21
22
23
24
25
func string(_ str: String) -> Parser<String> {
return Parser { input in
guard let (head, tail) = uncons(str.characters) else {
// 0. 把空字符解析器去解析任何字符串,都认为是解析成功
return ("", input)
}
// 1. 先解析第一个字符
guard let (_, remainder1) = character(head).parse(input) else {
return nil
}
// 2. 然后解析剩下的所有
guard let (_, remainder2) = string1(String(tail)).parse(remainder1) else {
return nil
}
// 3. 返回("结果", "剩余的字符串")
return (str, remainder2)
}
}

func uncons<C: Collection>(_ xs: C) -> (C.Iterator.Element, C.SubSequence)? {
guard let head = xs.first else {
return nil
}
return (head, xs.suffix(from: xs.index(after: xs.startIndex)))
}

观察 1 和 2,在这两步中,我们都没有使用解析的 结果,这两步实现的仅仅是 每次解析成功就 吃掉 结果!最后在第 3 步一次将结果返回。也就是说我们 1 和 2 这两本并不关心结果,只关心这些要解析道字符存在就行了。

我们把解析成功吃掉结果这一步封装一下:

1
2
3
4
5
6
7
8
9
10
11
12
func discarding<A, B>(_ x: Parser<A>, _ y: Parser<B>) -> Parser<B> {
return Parser { input in
guard let (_, remainder1) = x.parse(input) else {
return nil
}
guard let (result2, remainder2) = y.parse(remainder1) else {
return nil
}
// 只保留右边的解析器的结果 result2,没有 result1
return (result2, remainder2)
}
}

discarding 函数会 吃掉 左边第一个参数 x 的解析结果,返回值中只保留右边 y 的解析结果。用 discarding 函数重写一下上面的 string 函数:

1
2
3
4
5
6
7
8
9
10
11
12
13
14
func string(_ str: String) -> Parser<String> {
return Parser { input in
guard let (head, tail) = uncons(str.characters) else {
// 把空字符解析器去解析任何字符串,都认为是解析成功
return ("", input)
}
// 1 吃掉 character(head) 的结果
guard let (_, remainder) = discarding(character(head), string2(String(tail))).parse(input) else {
return nil
}
// 2 返回 ("结果", "剩余的字符串")
return (str, remainder)
}
}

这次改版的 string 里面第 1 步中的解析结果还是被忽略了,所以是否可以继续用 discarding 来简化?但是 discarding 函数需要两个解析器,但函数内只有 lift 返回的一个解析器,所以没办法继续简化了?

仔细看 string 函数体的第一行 return Parser {} 就是一个解析器,能否把这个解析器利用上呢?discarding 是在 Parser {} 里面的,所以只要能想办法把它展平,那么就能再次利用上 lift,而且展平后的解析器需要做为 string 函数的返回值,所以它肯定是做为 discarding 的右边的参数。

1
2
3
4
5
func string(_ str: String) -> Parser<String> {
let lhs = Parser {}
let rhs = Parser<String> {}
return lift(x, y)
}

根据第 2 步的 return (str, remainder) 可以知道,最终的返回结果是 (输入的,lhs 吃剩的),所以很容易得到 let rhs = Parser<String> { (str, $0) }。所以可以推出 lhs 要做的只是负责吃掉一部分。也就是上面的第 1 步所做的。所以:

1
2
3
4
5
6
7
8
9
10
11
12
func string(_ str: String) -> Parser<String> {
guard let (head, tail) = uncons(str.characters) else {
// 1 把空字符解析器去解析任何字符串,都认为是解析成功
return ("", input)
}
// 2 吃掉
let lhs = discarding(character(head), string2(String(tail)))
// 3 结果和剩下的
let rhs = Parser<String> { (str, $0) }
// 4 返回
return discarding(lhs, rhs)
}

函数的返回值是 Parser,由于外面没有 Parser {} ,展开后 1 那里需要返回一个 Parser。

1
2
3
4
5
6
7
8
9
10
11
12
func string(_ str: String) -> Parser<String> {
guard let (head, tail) = uncons(str.characters) else {
// 1 把空字符解析器去解析任何字符串,都认为是解析成功
return Parser<String> { ("", $0) }
}
// 2
let lhs = discarding(character(head), string2(String(tail)))
// 3
let rhs = Parser<String> { (str, $0) }
// 4
return discarding(lhs, rhs)
}

明眼人可以看到 1 和 3 只有 "" 和 str 不一样,剩下的一模一样,虽然代码不长,但我们还是把它相同部分封装成一个函数,然后把不同的部分做为参赛。

1
2
3
4
5
6
7
8
9
10
11
12
13
14
15
16
17
func string(_ str: String) -> Parser<String> {
guard let (head, tail) = uncons(str.characters) else {
// 1 把空字符解析器去解析任何字符串,都认为是解析成功
return pure("")
}
// 2
let lhs = discarding(character(head), string2(String(tail)))
// 3
let rhs = pure(str)
// 4
return discarding(lhs, rhs)
}

// Lift a value
func pure<A>(_ x: A) -> Parser<A> {
return Parser<A> { (x, $0) }
}

所以封装一个简洁的 string 解析器,花了很多功夫,但抛开性能,它比迭代的版本更简洁易懂。

Combine

观察表达式 ( 4 + 3 ),里面 ( 和 4 之间有 1 个空格,数字 3 和 ) 中间是有 2 个空格,在做加法运算的时候,这些 many 个空格是没有意义的,所以需要 skip 掉。

Many

首先需要解析空格的解析器,前面已经有实现过:

1
2
3
func space() -> Parser<Character> {
return satisfy(isSpace)
}

由于空格数量未知,可能有 many 个,假如有一个解析器,能够解析 many 个 parser。用一个 loop 不断去解析就能实现:

1
2
3
4
5
6
7
8
9
10
11
func many<A>(_ x: Parser<A>) -> Parser<[A]> {
return Parser { input in
var results: [A] = []
var stream = input
while let (result, remainder) = x.parse(stream) {
results.append(result)
stream = remainder
}
return (results, stream)
}
}

任意个空格就是:

1
2
3
func spaces() -> Parser<[Character]> {
return many(space())
}

spaces 得到的是一个 Parser<[Character]> 类型的 parser,但是按照理解更希望得到一个 Parser<String> 类型的 parser。在 Swift 中,String([Character]) 就能够将 [Character] 拍扁成 String 类型。所以把 many 稍微修改一下:

1
2
3
4
5
6
7
8
9
10
11
func many<Character>(_ x: Parser<Character>) -> Parser<String> {
return Parser { input in
var results: [Character] = []
var stream = input
while let (result, remainder) = x.parse(stream) {
results.append(result)
stream = remainder
}
return (String(results), stream)
}
}

因为不是任何泛型 A 类型,都能用 String 拍扁,也不一定能通过其他类型进行拍扁,所以这里把泛型 A 去掉,直接用 Character 代替。但是这样做并不理想,因为 many 解析器从一个泛型解析器,变成了一个只能解析 Character 类型的解析器,变成了 manyCharacter。后面考虑解析这个问题,重新把 many 变成通用的解析器。

Skip

接着实现一个通用的 skip 解析器,它要做的事情很简单,输入什么吃掉什么,返回剩下的,和上面吃掉左边的 discarding 很像,不一样的是 skip 只有一个参数。

1
2
3
4
5
6
7
8
9
func skip<A>(_ x: Parser<A>) -> Parser<Void> {
return Parser { input in
guard let (_, remainder) = x.parse(input) else {
return ((), input)
}

return ((), remainder)
}
}

把 skip 和 spaces 进行组合:

1
2
3
func skipSpaces() -> Parser<Void> {
return skip(spaces)
}

Many1

前面实现的 digit 解析器,它只能解析个位数,这是没有什么卵用的。相比 digit,更加需要的是一个 number 解析器。一个 number 实际上也是由 many 个 digit 组成。

1
2
3
4
5
6
func number() -> Parser<[Character]> {
return many(digit())
}

number().parse("123abc") // (["1", "2", "3"], "abc")
number().parse("abc") // ([], "abc")

等等!number().parse("abc") 也解析成功了,结果是空数组。这并不是想要的结果,一个 string 可以是空的,space 甚至也可以是空的,但一个 number 不能是空的。所以需要另外一个只是有一个的 many。这其实很常见,比如正则表达式中有 * 和 +,一个 {0, +} 一个是 {1, +}。

1
2
3
4
5
6
7
8
9
10
11
12
13
14
15
func many1<A>(_ x: Parser<A>) -> Parser<[A]> {
return Parser { input in
// 多加一个判断,第一个值必须满足条件
guard let (_, _) = x.parse(input) else {
return nil
}
var results: [A] = []
var stream = input
while let (result, remainder) = x.parse(stream) {
results.append(result)
stream = remainder
}
return (results, stream)
}
}

所以正确的 number 解析器就变成:

1
2
3
func number() -> Parser<[Character]> {
return many1(digit())
}

这里 number 解析器和 spaces 解析器遇到了同样的问题,number 解析器的结果应该是 Int(暂不考虑浮点数),而不是 [Character]。解决方法可以类似 manyCharacter,但是这显示是很有问题的,抽象抽象抽象!

程序员要有抽象思维,要学会用更高的层次的思维去看待问题,发现不同问题的共同点。[Character] 可以用 String([Character]) 变成一个 String。对于 digit character,同样的也是用 String([Character]) 拍扁,然后用 Int(String) 得到一个 number。

结合 Swift 的 OOP(面向协议编程),可以定义一个协议,暂且叫做 Combinable :D

1
2
3
4
5
6
7
8
9
10
11
12
13
14
15
16
17
18
19
20
21
22
23
24
25
26
27
28
29
30
31
protocol Combinable {
static func combine(_ xs: [Character]) -> Self
}

extension Int: Combinable {

static func combine(_ xs: [Character]) -> Int {
return Int(String(describing: xs))!
}
}

extension String: Combinable {
static func combine(_ xs: [Character]) -> String {
return String(describing: xs)
}
}

func many1<A: Combinable>(_ x: Parser<Character>) -> Parser<A> {
return Parser { input in
guard let (_, _) = x.parse(input) else {
return nil
}
var results: [Character] = []
var stream = input
while let (result, remainder) = x.parse(stream) {
results.append(result)
stream = remainder
}
return (A.combine(results), stream)
}
}

然后就可以得到:

1
2
3
4
5
6
7
func number() -> Parser<Int> {
return many1(digit())
}

func spaces() -> Parser<String> {
return many1(space()) // 忽略 spaces 可以为空的情况
}

实际上 skipSpaces 还可以用另外一个角度来拆分,上面先解析 many 个空格,然后一次 skip 掉。还可以每次 skip 一个空格,然后进行 many 次。不同的地方是 skip 和 many 两个 parser 的调用次序不一样,甚至还可以定义一个叫做 skipMany 的解析器,这也说明了 Combinator 的强大。通过定义一系列基础的 parser,进行不同的排列组合操作,最后覆盖所有的 case。(理想状态

Zip

合并两个 parser 的解析器 zip 的实现也很简单:

1
2
3
4
5
6
7
8
9
10
11
func zip<A, B>(_ x: Parser<A>, _ y: Parser<B>) -> Parser<(A, B)> {
return Parser { input in
guard let (result1, remainder1) = x.parse(input) else {
return nil
}
guard let (result2, remainder2) = y.parse(remainder1) else {
return nil
}
return ((result1, result2), remainder2)
}
}

Choice

接下来还需要解析几个简单的一元运算符 + - * /。去掉空格后,两个数中间必须是其中一个运算符那么表达式就是合法的。

1
2
3
4
func opt() -> Parser<Character> {
let opts = ["+", "-", "*", "/"].map { character($0.characters.first!) }
return choice(opts)
}
1
2
3
4
5
6
7
8
// 也可以叫 one(of:)
func choice<A, S: Sequence>(_ xs: S) -> Parser<A> where S.Iterator.Element == Parser<A> {
return xs.reduce(empty(), { $0 <|> $1 })
}

func empty<A>() -> Parser<A> {
return Parser { _ in nil }
}

Transform

上面利用 Protocol 实现的 number 和 space 解析器其实并不是很优雅,费了很大劲把 many 变得 通用,结果却并不是很 通用,因为要求结果的类型必须实现 Combinable 协议。但它做的工作却很少,只是把传入的 Parser<A> 循环解析得到的结果 [A] 在 many 内部 组合成最终的类型,实现把 Parser<[A] 转换为 Parser<B>。正由于它是在 many 内部做的操作,所以依赖于传入的类型,使得 many 不再那么通用。

再看 func character(_ character: Character) -> Parser<Character> 的定义,假如调用 character("4"),那么返回的是一个 Parser<Character> 类型的解析器,这个解析器调用 parse 方法,返回的结果是 Character 类型的值。在解析表达式 4 + 3 的时候,需要将解析到的 4 和 3 当作一个整数然后相加,才能得到最终的结果,所以不想要 Character 类型的值,而是想要 Int 类型的值,那么需要将 Parser<Character> 转换为 Parser<Int> 解析器。

所以,假如能实现一个函数,可以将任意 Parser<A> 转换为 Parser<B> 解析器,就完美了。many 只负责将 Parser<A> 解析得到 Parser<[A]>,然后由 number 自己将 Parser<[A]> 转换为 Parser<Int>。

Functor

回忆 Swift 中 Optional 类型中的 map 方法:

1
2
let a: Optional<Int> = 1
let b: Optional<String> = a.map { String($0) }

它将一个 Optional<Int> 转换为 Optional<String>,仔细一看,把 Optional 换成 Parser,就是我们所需要的转换解析器的方法。

Optional 的函数签名是 func map<U>(_ transform: (Wrapped) -> U) -> U?,所以依葫芦画瓢,我们可以得到:

1
2
3
4
5
6
7
8
struct Parser<A> {
func map<B>(_ transform: (A) -> B) -> Parser<B> {
return Parser { input in
guard let (result, remainder) = self.parse(input) else { return nil }
return (transform(result), remainder)
}
}
}

像上面的 satisfy 和其他函数一样,把 map 方法从结构图内移出来,则得到:

1
2
3
4
5
6
7
8
func map<A, B>(_ x: Parser<A>, _ f: @escaping (A) -> B) -> Parser<B> {
return Parser { input in
guard let (result, remainder) = x.parse(input)else {
return nil
}
return (f(result), remainder)
}
}

由于值是在 Parser 中包裹着的,想把返回的 Parser<Character 变成 Parser<Int>,需要把 Parser<Character> 解开取出里面的值,然后把它变成类型,然后重现包装起来。对于不同的类型转换,解包重新包装的步骤是一样的,不同的地方是把结果从一种类型变成另一种类型,函数的作用就是把相同的封装起来,把不同做为参赛传进去,所以在 map 函数的实现中,只需要在返回前,给外部将这个结果进行一次转换机会,所以需要一个参赛,能够将解开后得到的值变成另一种类型的值,也就是提供一个函数 (Character) -> Int。

重新实现 number 和 spaces:

1
2
3
4
5
6
7
func number() -> Parser<Int> {
return map(many1(digit()), { Int(String($0))! })
}

func spaces() -> Parser<String> {
return map(many(space()), { String($0) })
}

两种不同的结构体 Optional<T> 和 Parser<A>,都可以给它实现一个 map 方法,使得它变成一个不同类型的结构体。而支持这种 map 方法的结构体,我们称把它为 Functor。

简单来说,所谓的 Functor 就是可以把一个函数应用于一个 封装过的值 上,得到一个新的 封装过的值

Functor 最早出自于代数拓扑,这里说的 Functor 一般是指范畴论(Category Theory)中的 Functor,它被用来描述各种范畴间的关系。更多 Functor 的理解 Group Theory and Category Theory。

Applicative

1
2
3
func pure<A>(_ x: A) -> Parser<A> {
return Parser<A> { (x, $0) }
}

实际上前面的 pure 和 discarding 函数就是一种 Applicative。像 discarding 一样有时候只关心这些要解析道字符存在就行了,上面定义的 discarding 解析器作用是忽略第一个 parser 参数的解析结果,同样地,可以定义一个忽略第二个 parser 参数的解析器。比如当解析出现在右边的 symbol 的时候就很有用,discarding2(parser, string(")")) 的作用就是确保存在闭合的右括号 “)”。

1
2
3
4
5
6
7
8
9
10
11
12
13
/// 吃掉右边的结果
func discarding2<A, B>(_ x: Parser<A>, _ y: Parser<B>) -> Parser<B> {
return Parser { input in
guard let (result1, remainder1) = x.parse(input) else {
return nil
}
guard let (_, remainder2) = y.parse(remainder1) else {
return nil
}
// 只保留左边的解析器的结果 result1,没有 result2
return (result1, remainder2)
}
}
1
2
3
4
5
6
7
8
9
10
11
12
13
/// 吃掉左边的结果
func discarding1<A, B>(_ x: Parser<A>, _ y: Parser<B>) -> Parser<B> {
return Parser { input in
guard let (_, remainder1) = x.parse(input) else {
return nil
}
guard let (result2, remainder2) = y.parse(remainder1) else {
return nil
}
// 只保留右边的解析器的结果 result2,没有 result1
return (result2, remainder2)
}
}

这两个 discarding 函数长的很像,如果有办法把它们抽象一下,把相似的地方提取出来就好了。

对于两个结果,忽略其中一个,实际上很简单:

1
2
3
4
/// 忽略 B
func f<A, B>(_ a: A, _ b: B) -> A {
return a
}
1
2
3
4
/// 忽略 A
func f<A, B>(_ a: A, _ b: B) -> B {
return b
}
1
2
3
4
5
6
7
8
9
10
11
12
13
14
15
16
17
/// 吃掉左边的结果
func left<A, B>(_ x: Parser<A>, _ y: Parser<B>) -> Parser<B> {

func discarding<A, B>(_ a: A, _ b: B) -> A {
return b
}

return Parser { input in
guard let (result1, remainder1) = x.parse(input) else {
return nil
}
guard let (result2, remainder2) = y.parse(remainder1) else {
return nil
}
return (discarding(result1, result2), remainder2)
}
}

然后这个函数并没有卵用。

Monad

观看 map 函数 func map<A, B>(_ x: Parser<A>, _ f: (A) -> B) -> Parser<B>

它要求传入两个参数,一个是 Parser<A>,一个是函数 A -> B,第二个参数对标题中的 Combinator 并不是很友好,Parser Combinator 的思想是组合一系列的 Parser 得到结果。上面定义了有很多小的 parser,比如 func string(_ str: String) -> Parser<String>,函数签名是 (String) -> Parser<String>,由于 map 函数的第二个参数的签名是 (A) -> B,而非 (A) -> Parser<B>,所以假如存在一个与 map 功能相似,但第二个参数的签名是 (A) -> Parser<B>,则能够使得之前定义的很多小的 parser 能够直接作为一个参数,直接得到一个新类型的 Parser,大概这样:

1
func flatMap<A, B>(_ x: Parser<A>, _ f: (A) -> Parser<B>) -> Parser<B>

使用的时候:

1
let parser = flatMap(stringParser, string("alex"))

具体实现与 map 也很像:

1
2
3
4
5
6
7
8
func flatMap<A, B>(_ x: Parser<A>, _ f: @escaping (A) -> Parser<B>) -> Parser<B> {
return Parser { input in
guard let (result, remainder) = x.parse(input)else {
return nil
}
return f(result).parse(remainder)
}
}

Group Theory and Category Theory

Alternative

1
2
3
func empty<A>() -> Parser<A> {
return Parser { _ in nil }
}
1
2
3
4
5
func choice<A>(_ x: Parser<A>, _ y: Parser<A>) -> Parser<A> {
return Parser { input in
return x.parse(input) ?? y.parse(input)
}
}

Alternative 类似于 Swift Standard Library 中定义的运算符 ??,它有两个同类型的参数,第一个参数是偏爱的 parser,第二个参数是默认的 parser。它首先尝试使用第一个 parser 来进行解析,如果成功,则返回。如果不成功,则使用默认的 parser 进行解析。它的返回值类型也是同类型的 Parser。

作用是假如有 Int, String, Bool 三个类型的 parser,而一个 scalar 类型的 parser 只要能够解析 Int, String, Bool 任意一种类型,则算解析成功。换句话说就是 scalar 是 Int, String, Bool 的父集。一种简单的从 Parser<Int>, Parser<String>, Parser<Bool> 三种已有实现的 parser 得到 Parser<Scalar> 的方法是逐个进行 parse,如果成功则马上返回。

1
let scalar = parserInt <|> parserString <|> parserBool

从这个例子看有点 one of 的意思,但实际上更加准确的说法是 choice。

Applicative & Monad

Applicative 和 Monad 的区别在于:

Applicative 的两个 parser 是相互独立的,组合后的新 parser 是可以静态分析其行为的。而对于 Monad,在不知道输入的情况下,是不能确定其行为,也就是说 Monad 是依赖于计算结果。

1
2
3
4
5
6
7
8
9
10
11
12
13
14
func alex(_ x: Parser<String>) -> Bool {
if let (_, _) = x.parse("alex.huo") {
return true
}
return false
}

let af: Parser<(String) -> String> = pure(id)
let ax = string("alex")
alex(af <*> ax) // true

let mf: (String) -> Parser<String> = { string($0) }
let mx = string("alex")
alex(mx >>- mf) // false

Ref

Jiffy
Parser combinators
Monadic Parser Combinators

Cherry Blessing

发表于 2017-05-20

Welcome to Cherry Blessing.

Xspyhack

Xspyhack

Why join the navy if you can be a pirate?

11 日志
3 分类
29 标签
© 2023 Xspyhack
由 Hexo 强力驱动
主题 - NexT.Muse